Pi Power M.2 NVMe & PoE+ Hat for Raspberry Pi 5, Support M.2 NVMe SSDs 2230/2242/2260/2280
SKU :MRA01305D
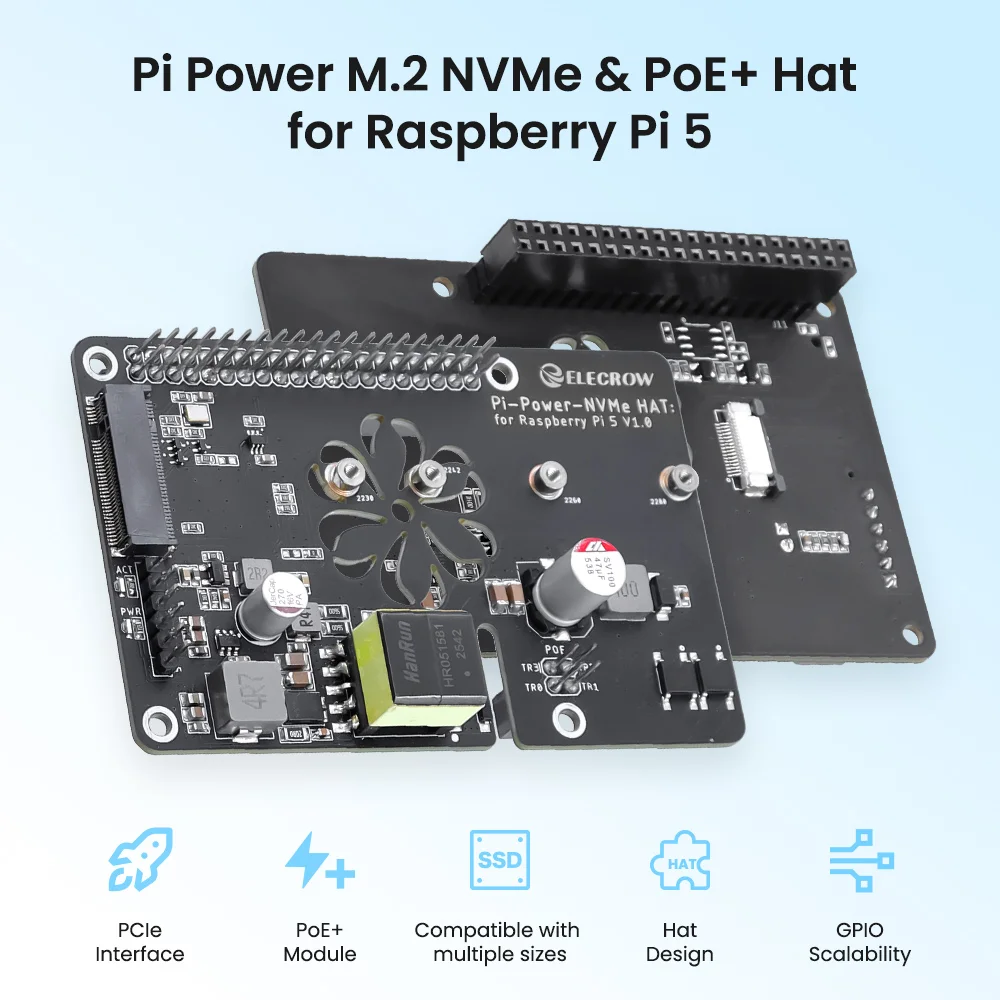
Pi Power M.2 NVMe and PoE+ Hat
This is a high-performance, multi-functional expansion board designed specifically for the Raspberry Pi 5, integrating high-speed storage, network power supply, and powerful expansion capabilities. It supports M.2 NVMe SSDs (compatible with various sizes from 2230 to 2280) via a native PCIe interface, significantly improving system response and data read/write speeds. It also integrates a PoE+ module compliant with the 802.3af/at standard, allowing direct power supply to devices via Ethernet cable, greatly simplifying cabling deployment.
Note
If you encounter a power supply limitation prompt

Simply add usb_max_current_enable=1 to /boot/firmware/config.txt.
Installation and Wiring
Accessories:

First, connect the ribbon cable: one end to the PCIe interface on the HAT, the other end to the PCIe interface on the Raspberry Pi 5. Note the ribbon cable orientation:
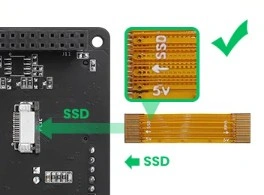
Then insert and install it into the 40-pin connector, securing it with copper studs and screws. Finally, install the SSD.
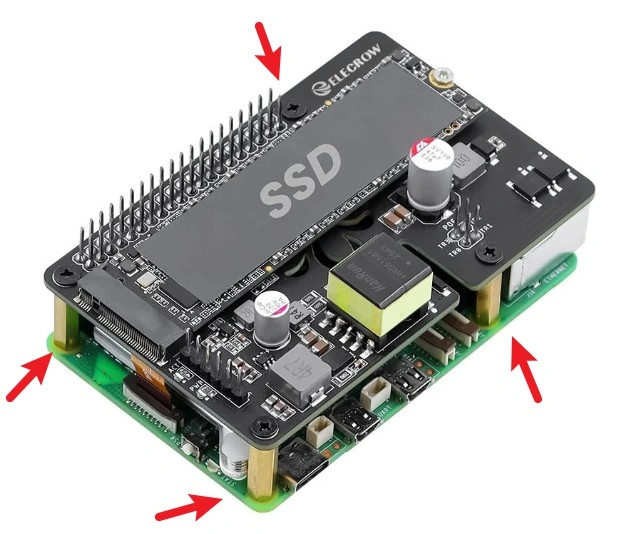
Hard Drive Mounting
1,Enable PCIe interface
The PI5B does not enable the PCIe interface by default. Add the following to /boot/firmware/config.txt:
dtparam=pciex1
2,PCIe defaults to Gen2. To enable PCIe Gen3, add the following to /boot/firmware/config.txt:
3,After making the changes, restart PI5, and it will recognize the device.
As shown in the image below, the SM2263 is identified as my SSD, while the other PI5 is the RPI chip.

4: Partitioning. If partitioning and formatting have already been performed on other platforms, skip this step (this will erase all data on the SSD—proceed with caution).
Partitioning
sudo fdisk /dev/nvme0n1    The device number is the total device number; do not add p1, as that is merely a partition.
How to use the fdisk partitioning tool
n Create a new partition
q Exit without saving
p Print the partition table
m Print the selection menu
d Delete a partition
w Save and exit
t Change the ID number
To add a partition, simply execute n, then w to save and exit.
5,Format
sudo mkfs. Then press Tab to see various file system extensions. Each extension represents a different file system format you can choose for formatting.

Suppose I want to format it as ext4 file system, then execute:
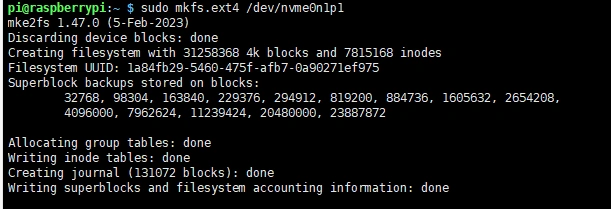
sudo mkfs.ext4 /dev/nvme0n1p1
Wait a moment. Once “done” appears, it means the formatting is complete.
6,Mount.
Create mount directory
sudo mkdir toshiba
Mount device
sudo mount /dev/nvme0n1p1 ./toshiba
Check disk status
df -h
Read/Write Test
Navigate to the directory of the mounted disk.
- Release memory
- Copy Raspberry Pi Memory Contents to Hard Drive (Write)

- Copy hard drive contents to Raspberry Pi memory (read from /etc/fstab)

- Note: Test results may vary depending on the specific card and environment. Raspberry Pi systems are particularly susceptible to performance fluctuations. For accurate performance testing, use a PC.
Automatic Mounting
If testing is successful and the disk is not required as a system drive, but only for storage expansion, configure automatic mounting.
sudo nano /etc/fstab

#Add at the end
/dev/nvme0n1p1  /home/pi/toshiba  ext4  defaults  0  0
#/dev/nvme0n1p1 device name, /home/pi/toshiba mount point, ext4 filesystem type, defaults use default mount options
#Apply changes (test first, then reboot; otherwise, failure to mount may prevent system startup)
sudo mount -a

#Then reboot
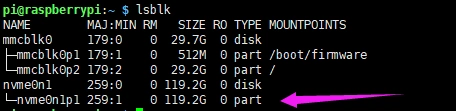
Check devices using lsblk
NVMe SSD Guided Startup
First, boot the Raspberry Pi from the SD card. Mount it for testing to ensure the hardware functions properly.
1,Execute.
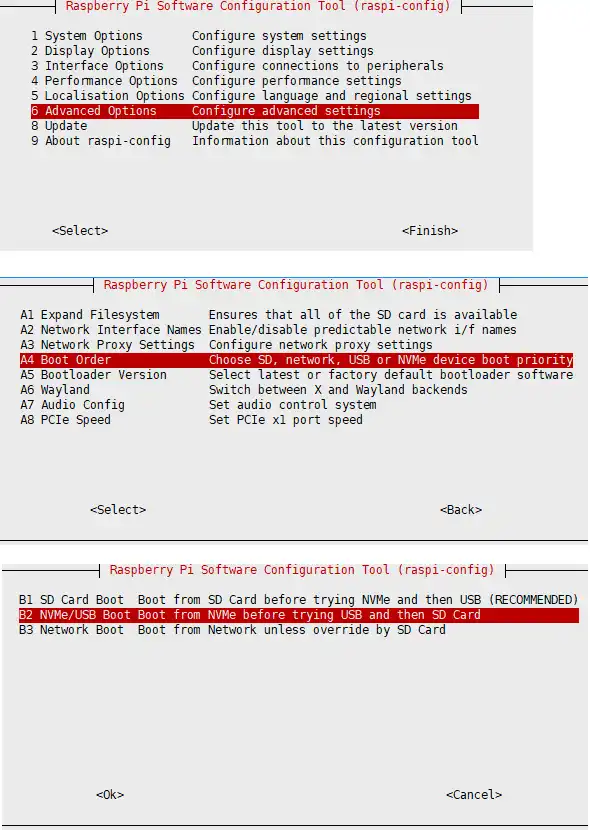
2,Restart the Raspberry Pi.
If you encounter repeated modification failures, please connect to the network before making changes (wait for the network to synchronize automatically), or set the correct time before modifying the file.
3,Flash the system to the NVMe drive, then connect the NVMe drive to the expansion board. Remove the SD card and power cycle the system.
FAQ
The Pi Power M.2 NVMe & PoE+ HAT extends the Raspberry Pi 5's native PCIe interface. NVMe detection and booting therefore depend on the Raspberry Pi OS configuration, bootloader firmware, PCIe ribbon cable connection, and SSD compatibility.
Q1: Can it be used on the Raspberry Pi 4B or Pi 3B+?
No, it only supports Pi 5 usage.
Q2: The NVMe SSD is not detected, or the Raspberry Pi 5 cannot boot from it. What should I do?
Please check the following items:
- Use a current version of Raspberry Pi OS and update the system and bootloader firmware:
After rebooting, run the following command to confirm the bootloader version:
- Enable the Raspberry Pi 5 PCIe interface by adding the following line to
/boot/firmware/config.txt:
Save the file and reboot the Raspberry Pi.
-
Make sure the SSD is an M.2 NVMe (PCIe) SSD. M.2 SATA/NGFF SSDs are not supported. The HAT supports 2230, 2242, 2260, and 2280 sizes.
-
Power off the Raspberry Pi and check that both ends of the PCIe ribbon cable are fully inserted, correctly oriented, and locked in their connectors. Check the SSD connection and mounting screw as well.
-
After rebooting, check whether the SSD is detected:
-
If the SSD is still not detected, test with another known-compatible NVMe SSD or another PCIe ribbon cable. Some SSD models may have firmware or PCIe compatibility issues.
-
PCIe Gen2 is recommended for initial troubleshooting. If
dtparam=pciex1_gen=3is present in/boot/firmware/config.txt, temporarily remove or comment it out and test again.
Q3: The Raspberry Pi 5 does not start after the HAT is installed. How can I troubleshoot it?
Power off the system and disconnect all power sources before checking the hardware.
- Confirm that the HAT is aligned correctly with the Raspberry Pi 5's 40-pin GPIO header.
- Confirm that the supplied standoffs and screws are installed correctly and that no metal part is touching exposed contacts on either PCB.
- Check that the PCIe ribbon cable is correctly oriented, fully inserted, and not damaged or sharply folded.
- Reseat the NVMe SSD and make sure its mounting screw is not overtightened.
- Temporarily remove the HAT and verify that the Raspberry Pi can boot normally by itself. Then reconnect the HAT, ribbon cable, and SSD one item at a time to locate the problem.
When installing the assembly in a metal enclosure, use suitable insulation and make sure the HAT, SSD, and ribbon cable contacts cannot touch the enclosure.
Q4: Which NVMe SSDs are compatible with this HAT?
The HAT supports M-Key M.2 NVMe PCIe SSDs in 2230, 2242, 2260, and 2280 sizes. It does not support M.2 SATA/NGFF SSDs.
Most standard NVMe SSDs should work, but boot and PCIe compatibility can vary between SSD controllers and firmware versions. If an SSD is not detected or cannot boot after the configuration, cable, and bootloader have been checked, test with another NVMe SSD model. For best compatibility, update Raspberry Pi OS and the Raspberry Pi 5 bootloader before testing.
Some high-performance PCIe Gen4 SSDs do not negotiate reliably at the Raspberry Pi 5's default PCIe Gen2 speed. A drive working in a PC does not necessarily confirm Raspberry Pi 5 compatibility. High-end SSDs may also provide little practical benefit because performance is limited by the Raspberry Pi 5's single PCIe lane.
Q5: Does the HAT support PCIe Gen3, or only PCIe Gen2?
The Raspberry Pi 5 uses PCIe Gen2 by default. The HAT can operate in PCIe Gen3 mode, which can be enabled by adding the following line to /boot/firmware/config.txt:
Then reboot the Raspberry Pi. PCIe Gen3 mode is not guaranteed for every SSD, ribbon cable, or system configuration. If the SSD becomes unstable, disappears, produces I/O errors, or prevents booting, remove this line and return to the default PCIe Gen2 mode.
Q6: The NVMe SSD is detected, but the Raspberry Pi cannot boot from it. Why?
Try the following steps:
-
Boot Raspberry Pi OS from a microSD card and confirm that the NVMe SSD appears in
lsblk. -
Update Raspberry Pi OS and the bootloader firmware.
-
Write a current Raspberry Pi OS image to the NVMe SSD using Raspberry Pi Imager, or copy a working microSD installation to the SSD with SD Card Copier.
-
Shut down the Raspberry Pi completely, remove the microSD card, and then power it on again.
-
Open the bootloader configuration with:
Under Advanced Options > Boot Order, select an option that allows NVMe boot, then reboot.
- If the SSD is detected but still does not boot, rewrite the OS image and test again. If the problem continues, try another NVMe SSD because the original SSD may have a firmware or compatibility issue.
Q7: The NVMe SSD appears in lsblk, but it is not shown in the file manager. How do I use it?
A new SSD normally has no partition or file system. Detection by lsblk only confirms that the hardware is recognized; the drive must be partitioned, formatted, and mounted before it can store files.
Warning: The following procedure erases data on the selected SSD. Confirm the device name carefully. It is usually
/dev/nvme0n1, but you must verify it withlsblk.
- Check the SSD device name:
- Create a GPT partition table and one partition using
fdisk:
In fdisk, enter g, n, accept the default values, and then enter w to save.
- Format the new partition as ext4:
- Create a mount point and mount it:
For automatic mounting after reboot, use the UUID reported by sudo blkid /dev/nvme0n1p1 in /etc/fstab. Do not use a device name alone, because device numbering can change.
Q8: Why is the NVMe speed test only about the same as a microSD card?
First confirm that the test file is being created on the NVMe SSD. Commands such as dd if=/dev/zero of=./Testingfile ... test the current directory; if the terminal is in the home directory on the microSD card, the result is not the NVMe speed.
Check the mounted NVMe path and run the test there:
lsblk -o NAME,SIZE,FSTYPE,MOUNTPOINTS,MODEL
findmnt /mnt/nvme
cd /mnt/nvme
sudo dd if=/dev/zero of=nvme-test.bin bs=1M count=1024 oflag=direct status=progress
sudo rm nvme-test.bin
Replace /mnt/nvme with the actual NVMe mount point. Results depend on the SSD, file system, PCIe generation, available SSD cache, temperature, and test method. PCIe Gen2 will normally be slower than Gen3. If performance is unexpectedly low, reseat the ribbon cable and test with the default Gen2 setting before trying Gen3.
Q9: Why does the NVMe SSD disconnect or report I/O errors during copying or heavy use?
Intermittent disconnection is commonly related to the PCIe link, power, temperature, or SSD compatibility. Check the following:
-
Return to PCIe Gen2 by removing
dtparam=pciex1_gen=3from/boot/firmware/config.txt. Gen3 is not guaranteed to be stable on every setup. -
Power off the system and reseat both ends of the PCIe ribbon cable and the SSD. Replace the ribbon cable if possible.
-
Update Raspberry Pi OS and the bootloader firmware.
-
Check recent kernel messages after the problem occurs:
- If Raspberry Pi OS reports a power-supply limitation, add the setting documented for this HAT to
/boot/firmware/config.txt, then reboot:
-
Ensure adequate airflow around the SSD. Sustained transfers can heat high-performance NVMe drives and cause thermal throttling or instability.
-
Test with another Raspberry Pi 5 or a lower-power, known-compatible NVMe SSD to isolate a board, SSD, or host compatibility problem.
Do not connect an additional power source to undocumented pins or connectors. Use only the HAT's documented power-input methods.