Elecrow 10.1 Inch Touchscreen 1280x800 IPS TFT LCD Monitor Kit
Description
This 10.1 inch portable monitor supports 800x1280 resolution, the image is clear and colorful. IPS provides advanced in-plane switching technology for premium color performance at any viewing angle.
Supporting 6 points touch maximum, no extra driver needed, just connect the USB cable to your signal output device like PC/Raspberry Pi to achieve the touch screen function.
It can work with most devices with HDMI port, compatible with Win 7 8 10 PC, Raspberry Pi,car audio and video, industrial equipment, and medical equipment.
Separating the PCBA from the screen increases DIY flexibility, allowing you to design the screen to suit your needs.
Model: DIS10185P

Features
- Free-driver, Plug and Play
- The display mode is portrait by default and landscape by configuration
- 1280×800 resolution, HD display
- IPS full viewing
- 6 points capacitive touchscreen
- Supports Raspberry OS, Ubuntu, Win7, Win8, Win10 systems
- Apply to secondary screen display, factory equipment, medical equipment, etc
Specifications
TFT LCD Monitor
| Panel Size | 10.1 inch |
|---|---|
| Resolution | 800x1280 |
| Pixel arrangement | RGB Vertical Stripe |
| Display Mode | TFT/IPS with Normally Black/Transmisstive |
| Touch | 6 Points Capacitive Touchscreen |
| Touch IC | GT9271 |
| Driver IC | JD9365AA |
| Viewing Angle | 80/80/80/80 (Typ.)(CR≥10) |
| Display Color | 16.7M |
| Surface Treatment | Anti-Glare and Hard-coating 3H |
| Interface | MIPI |
| Backlight | White LED |
| LCM+CTP Brightness | 500(Typ.) |
| Backlight | 7S4P |
| Response time | 30ms(Tr+Td)(Typ.) |
| Operation Voltage | 3.3V |
| Operation Temperature | -20~70 ℃ ” |
| Storage Temperature | -30~80 ℃” |
| Weight | 240 g(Typ.) |
Driver Board
| PCBA Dimension | 111.5(W) x 60(H) x 7.5(T) mm |
|---|---|
| Supported Touch Panel | Capactive Touch Panel |
| Input Signal Interface | Micro HDMI Female Connector |
| USB Port Interface | 5 Pin 2mm Pitch Connector |
| Input Voltage | 5V |
| Operating Temperature | -10 ~60 ℃ |
| Storage Temperature | -20 ~80 ℃ |
Interface
Usage
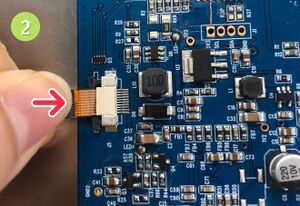
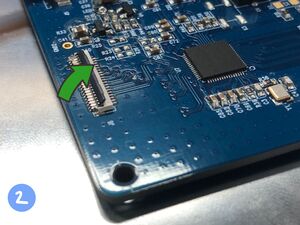
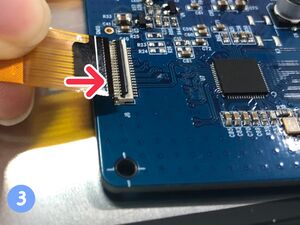
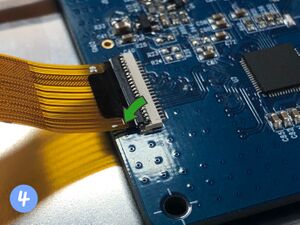
How to connect flat cable
1. MIPI LCD Panel
 |  |  |
2. Capactive Touch Panel
 |  |  |  |
Raspberry Pi OS touchscreen rotate
Step 1 LCD Display rotate
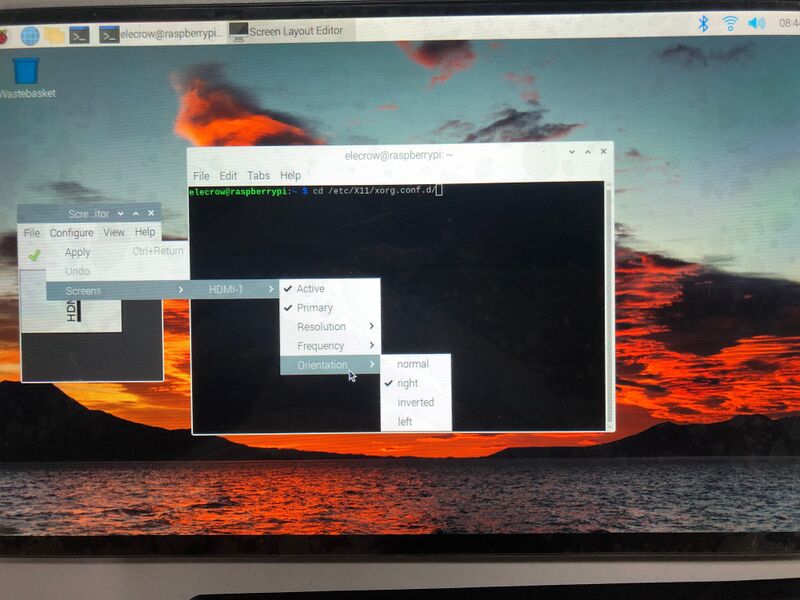
Head to your Pi desktop and click on the Pin icon on the top left of the display. Hover on the preferences option and click on Screen configuration. Select the display you wish to rotate. Hover over orientation and choose the way you want to modify your Display. Click on the Ok button to confirm and wait for 10 seconds till the timer ends.
Step 2 Touchscreen rotate
2.1 Viewing touch screen information 2.1.1. Installing XInput
2.1.2. List all input device information
Get the following information:
pi@raspberrypi:~ $ xinput --list
⎡Virtual corepointer                        id=2 [masterpointer  (3)]
⎜   ↳Virtual core XTESTpointer                id=4 [slave  pointer (2)]
⎜   ↳Silicon WorksMulti-touch SW4101C             id=6 [slave  pointer (2)]
⎣Virtual corekeyboard                     id=3 [master keyboard (2)]
    ↳Virtual core XTEST keyboard              id=5 [slave keyboard (3)]
pi@raspberrypi:~ $
2.1.3. List target device attributes
Note: The touch function is connected via USB. You should find the device with "USB" and its corresponding id number
Device 'Silicon Works Multi-touch SW4101C':
       DeviceEnabled (114):   1
       CoordinateTransformation Matrix (115):   1.000000,0.000000, 0.000000, 0.000000, 1.000000, 0.000000, 0.000000, 0.000000, 1.000000
       libinputCalibration Matrix (246): -1.000000,0.000000, 1.000000, 0.000000, -1.000000, 1.000000, 0.000000, 0.000000, 1.000000
       libinputCalibration Matrix Default (247):   1.000000,0.000000, 0.000000, 0.000000, 1.000000, 0.000000, 0.000000, 0.000000, 1.000000
       libinputSend Events Modes Available (248):     1,0
       libinputSend Events Mode Enabled (249): 0, 0
       libinputSend Events Mode Enabled Default (250):   0,0
       DeviceNode (251):       "/dev/input/event0"
       DeviceProduct ID (252):      10685, 16641
2.2 Modifying configuration files 2.2.1 Install libinput,Check whether there is the file 40-libinput.conf in the directory /usr/share/x11/xorg.conf.d/If not, it needs to be installed
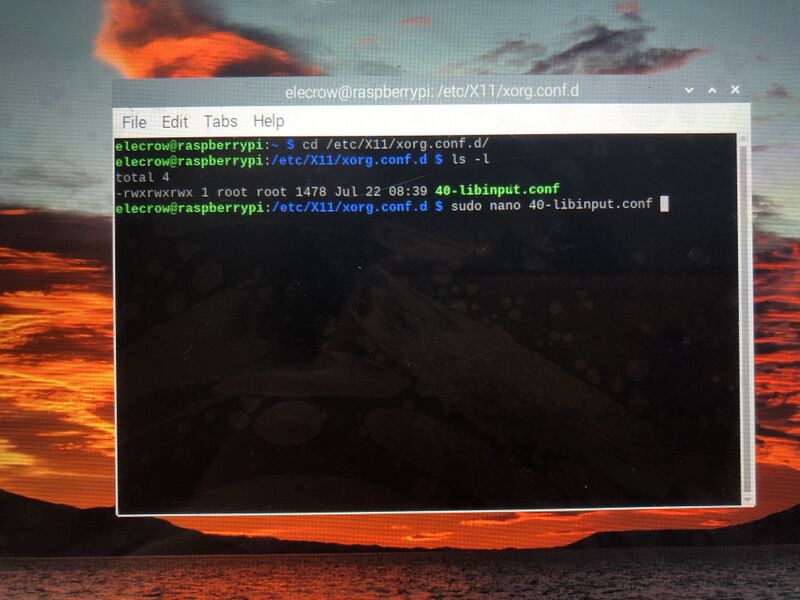
2.2.2 Copy the file to /etc/x11/xorg.conf.d/ directory
2.2.3 Enter /etc/x11/xorg.conf.d/ directory and modify 40 libinput Conf file
Find touchscreensection
Section"InputClass"
   Identifier "libinput touchscreencatchall"
   MatchIsTouchscreen "on"
   MatchDevicePath "/dev/input/event*"
   Driver "libinput"
EndSection
Add a line of option "calibrationmatrix" "0 1 0 -1 0 1 0 0 1" The result is
Section"InputClass"
   Identifier "libinput touchscreencatchall"
   Option "CalibrationMatrix" " -1 0 1 0 -1 1 0 0 1“
   MatchIsTouchscreen "on"
   MatchDevicePath "/dev/input/event*"
   Driver "libinput"
EndSection
Step 3 Reboot
Note:****1.CalibrationMatrix
90 degree rotation:Option "CalibrationMatrix" "0 1 0 -1 0 1 0 0 1"
180 degree rotation:Option "CalibrationMatrix" "-1 0 1 0 -1 1 0 0 1"
270 degree rotation:Option "CalibrationMatrix" "0 -1 1 1 0 0 0 0 1"
2.If you cannot rotate the touch screen through vim, please use nano
3.Get file permissions
FAQS
You can list you question here or contact with techsupport@elecrow.com for technology support.


