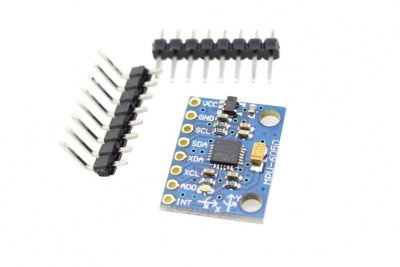
MPU-6050
Introduction
The MPU-6000™ family provides the world’s first integrated 6-axis MotionProcessing™ solution that eliminates the package-level gyro/accel cross-axis misalignment associated with discrete solutions. The devices combine a 3-axis gyroscope and a 3-axis accelerometer on the same silicon die together with an onboard Digital Motion Processor™ (DMP™) capable of processing complex 9-axis MotionFusion algorithms. The parts’ integrated 9-axis MotionFusion algorithms access external magnetometers or other sensors through an auxiliary master I2C bus, allowing the devices to gather a full set of sensor data without intervention from the system processor. For precision tracking of both fast and slow motions, the parts feature a user-programmable gyro full-scale range of ±250, ±500, ±1000, and ±2000°/sec (dps) and a user-programmable accelerometer full-scale range of ±2g, ±4g, ±8g, and ±16g.
The MPU-6050 supports I2C communications at up to 400kHz and has a VLOGIC pin that defines its interface voltage levels; Additional features include an embedded temperature sensor and an on-chip oscillator with ±1% variation over the operating temperature range.
Model:SPS06050S
Specification
- I2C Digital-output of 6 or 9-axis MotionFusion data in rotation matrix, quaternion, Euler Angle, or raw data format.
- Input Voltage: 3 - 5V.
- Selectable Solder Jumpers on CLK, FSYNC and AD0.
- Tri-Axis angular rate sensor (gyro) with a sensitivity up to 131 LSBs/dps and a full-scale range of ±250, ±500, ±1000, and ±2000dps.
- Tri-Axis accelerometer with a programmable full scale range of ±2g, ±4g, ±8g and ±16g.
- Digital Motion Processing™ (DMP™) engine offloads complex MotionFusion, sensor timing synchronization and gesture detection.
- Embedded algorithms for run-time bias and compass calibration. No user intervention required.
- Digital-output temperature sensor.
- Dimensions: 20 * 15 * 1.6mm.
Usage
Hardware
Connect this module to arduino via I2C bus as below:
Programming
1.Download the library File:MPU6050 Library
2.Unzip it into the libraries file of Arduino IDE by the path: ..\arduino-1.0\libraries.
3.Open the code directly by the path:File -> Example ->MPU6050->Examples->MPU6050_raw.
// Arduino Wire library is required if I2Cdev I2CDEV_ARDUINO_WIRE implementation
// is used in I2Cdev.h
#include "Wire.h"

// I2Cdev and MPU6050 must be installed as libraries, or else the .cpp/.h files
// for both classes must be in the include path of your project
#include "I2Cdev.h"
#include "MPU6050.h"

// class default I2C address is 0x68
// specific I2C addresses may be passed as a parameter here
// AD0 low = 0x68 (default for InvenSense evaluation board)
// AD0 high = 0x69
MPU6050 accelgyro;

int16_t ax, ay, az;
int16_t gx, gy, gz;

#define LED_PIN 13
bool blinkState = false;

void setup() {
    // join I2C bus (I2Cdev library doesn't do this automatically)
    Wire.begin();

    // initialize serial communication
    // (38400 chosen because it works as well at 8MHz as it does at 16MHz, but
    // it's really up to you depending on your project)
    Serial.begin(38400);

    // initialize device
    Serial.println("Initializing I2C devices...");
    accelgyro.initialize();

    // verify connection
    Serial.println("Testing device connections...");
    Serial.println(accelgyro.testConnection() ? "MPU6050 connection successful" : "MPU6050 connection failed");

    // configure Arduino LED for
    pinMode(LED_PIN, OUTPUT);
}

void loop() {
    // read raw accel/gyro measurements from device
    accelgyro.getMotion6(&ax, &ay, &az, &gx, &gy, &gz);

    // these methods (and a few others) are also available
    //accelgyro.getAcceleration(&ax, &ay, &az);
    //accelgyro.getRotation(&gx, &gy, &gz);

    // display tab-separated accel/gyro x/y/z values
    Serial.print("a/g:\t");
    Serial.print(ax); Serial.print("\t");
    Serial.print(ay); Serial.print("\t");
    Serial.print(az); Serial.print("\t");
    Serial.print(gx); Serial.print("\t");
    Serial.print(gy); Serial.print("\t");
    Serial.println(gz);

    // blink LED to indicate activity
    blinkState = !blinkState;
    digitalWrite(LED_PIN, blinkState);
}
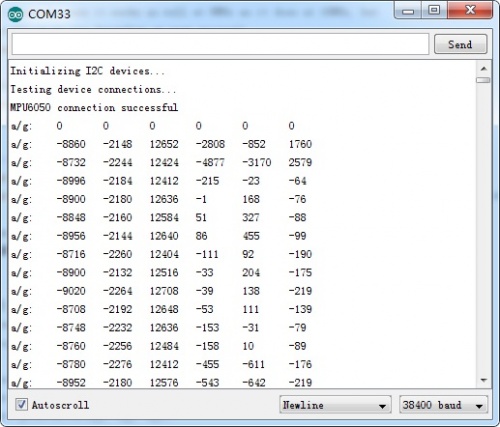
4.Upload the code,then open the serial monitor to see the test result.


