Crowtail- A6 GPRS/GSM Module
Description
This is a A6 GPRS/GSM Shield, which is use the newest A6 GSM/GPRS module , A6 module is a GSM/GPRS function module.It supports GSM/GPRS Quad-Band(850、9001800/1900) network. Also, it supports voice calls,SMS messages,GPRS data service and so on .We can use it make a simple phone. The module is controlled by AT command via UART and supports 3.3V and 4.2V logical level.
Model: CT009818G

Features
- Crowtail compatible
- Work voltage: 4.2V
- Operating temperature -30 ℃ to + 80 ℃;
- 1KG peak suction
- Low standby current
- Standby average current 3ma less;
- Support the GSM / GPRS Quad-band, including 850,900,1800,1900MHZ;
- Support China Mobile and China Unicom's 2G GSM network worldwide;
- GPRS Class 10;
- Sensitivity <-105;
- Support voice calls;
- Support SMS text messaging;
- Support GPRS data traffic, the maximum data rate, download 85.6Kbps, upload 42.8Kbps;
- Supports standard GSM07.07,07.05 AT commands and extended commands Ai-Thinker;
- Supports two serial ports, a serial port to download an AT command port;
- AT command supports the standard AT and TCP / IP command interface;
- Support digital audio and analog audio support for HR, FR, EFR, AMR speech coding;
- Support ROHS, FCC, CE, CTA certification;
- SMT 42PIN
Specification
- Quad-band: 850/900/1800/1900 MHz
- GPRS multi-slot: 12, 1 to 12 may be configured
- GPRS mobile station: Class B
- Compatible with GSM Phase 2/2 +: Class 4 (2W @ 850/900 MHz) Class 1 (1W @ 1800 / 1900MHz)
- Current consumption: 1.3mA @ DRX = 5; 1.2mA @ DRX = 9
- AT command control: Standard GSM07.07,07.05 AT commands and extended commands Ai-Thinker
- SIM Application Toolkit
- GPRS Class 10: Up 85.6 kbps (upstream) & 42.8Kbps (downlink)
- PBCCH support
- Coding scheme: CS 1, 2, 3, 4
- Support CSD: Up 14.4 kbps
- Support USSD
- Stack: PPP / TCP / UDP / HTTP / FTP / SMTP / MUX
- Dimensions(mm):50.0(L)x35.0(W)x7.2(H)
Cautions
- Make sure your SIM card is unlocked.
- The product is provided as is without an insulating enclosure. Please observe ESD precautions specially in dry (low humidity) weather.
- It just supports baud rate 115200bps.
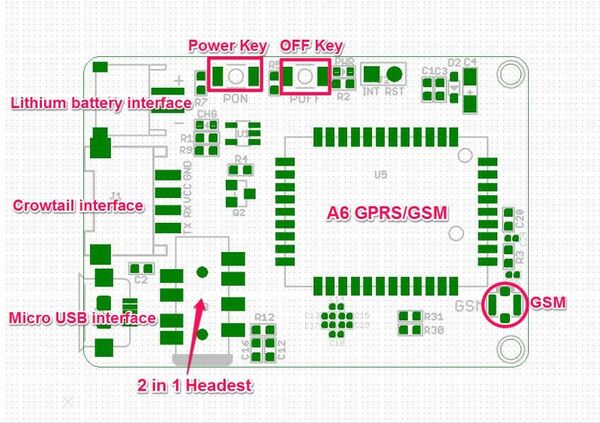
Interface Function
Usage
Hardware installation
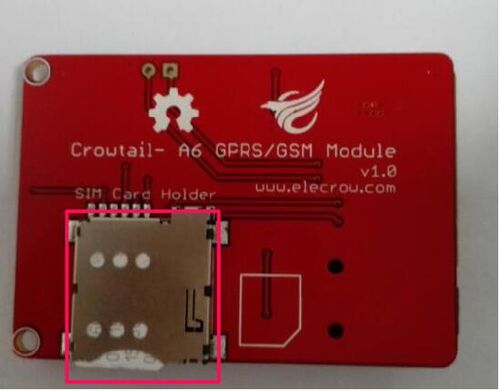
Insert an Micro SIM card to SIM Card Holder
6 Pin Holder for SIM Cards. Both 1.8 volts and 3.0 volts SIM Cards are supported by A6 GPRS/GSM Module, the SIM card voltage type is automatically detected.
Connect the Antenna
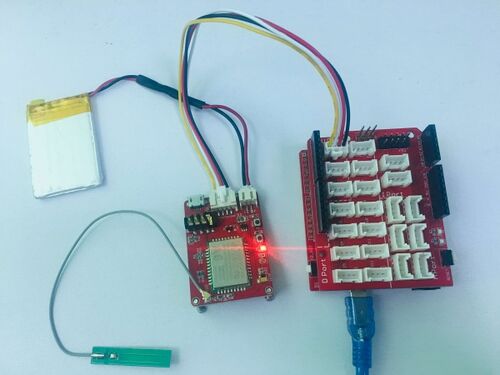
A miniature coaxial RF connector is present on the Crowtail- A6 GPRS/GSM Module to connect with a GSM Antenna. The connector present on the Crowtail- A6 GPRS/GSM Module is called a U.FL connecto.The GSM Antenna supplied with the GPRS Shield has an SMA connector (and not an RP-SMA connector) on it.The connection topology is shown in the diagram below:
Plug to Arduino/Crowduino
Connect the Crowtail- A6 GPRS/GSM Module to U1 port on Crowtail- Base shield,and then plug the base shield onto Arduino.
Download Code
1. Type command in the terminal to execute different function, threr are 4 functions in the demo:
1)If you input 't', the demo will send a SMS message to another cellphone which you set(you need set the number in the code);
2)If you input 'd', the program will dial a call to the other cellphone that you set(it is also need you set in the code );
3)If you input 'h', it will submit a http request to a web that you want to access(it need you set the web adress in the code), it will return a string from the website if it goes correctly;
4)If you input 's', it will upload the datas to the pachube(for detail you can refer to the explanation in the code). I strongly recommend you input 'h' before input 's', because uploading datas to the pachube need do some setting, after execute the function of submit a http request, the setting will be set.
2. If the program returns error in the terminal after you typed the command, don't worry, just try input the command again.
#include <String.h>
unsigned char SigQ[50];
unsigned char SigQ1[5]={'a','a','a','a','a'};
int SIGQ=0;

void setup()
{
  Serial1.begin(115200);               // the GPRS baud rate
  Serial.begin(115200);    // the GPRS baud rate
  delay(500);
//    mySerial.println("AT+CPIN?");  //get the signal Quality
//  delay(100);
//    pinMode(9, OUTPUT);
//  digitalWrite(9,LOW);
//  delay(1000);
//  digitalWrite(9,HIGH);
//  delay(1500);
//  digitalWrite(9,LOW);

//*******************************************************
//GetSignalQuality();
//*******************************************************
  for(int x=0;x<20;x++)
    {

   GetSignalQuality();
    delay(800);
    for(int i=0;i<26;i++)
    {
   if(SigQ[i]==58)
   {
     int j=0;
     int k=0;
     i++;i++;
     while((SigQ[i+j])!=44)
     {
      if((SigQ[i+j]>='0'&&SigQ[i+j]<='9'))  //>=48 <=57
      {
      SigQ1[j]=SigQ[i+j];
       }
       j++;  //j=1
     }
     SIGQ=SigQ1[0]-'0';

     if(j==2)
     {
     SIGQ=SIGQ*10+SigQ1[1]-'0';
     }
   Serial.println("");
   Serial.print("SIGQ:");
   Serial.println(SIGQ);
     }
   }
   if ( Serial1.available())
    Serial.write( Serial1.read());
   if (SIGQ>=10)
   {
     break;
   }
   if(x==20)
   {
    Serial.print("The Signal Quality is poor!");
   }
   }
  delay(2000);
DialVoiceCall();
if ( Serial1.available())
    Serial.write( Serial1.read());
}

void loop()
{
  //after start up the program, you can using terminal to connect the serial of gprs shield,
  //if you input 't' in the terminal, the program will execute SendTextMessage(), it will show how to send a sms message,
  //if input 'd' in the terminal, it will execute DialVoiceCall(), etc.
// GetSignalQuality();
 delay(500);
  if (Serial.available())
    switch(Serial.read())
   {
     case 't':
       SendTextMessage();
       break;
     case 'd':
       DialVoiceCall();
       break;
     case 'h':
       SubmitHttpRequest();
       break;
     case 's':
       Send2Pachube();
       break;
     case 'q':
       GetSignalQuality();
       break;
   }
  if ( Serial1.available())
    Serial.write( Serial1.read());
}

///SendTextMessage()
///this function is to send a sms message
void SendTextMessage()
{
   Serial1.print("AT+CMGF=1\r");    //Because we want to send the SMS in text mode
  delay(100);
   Serial1.println("AT + CMGS = \"+8613016490443\"");//send sms message, be careful need to add a country code before the cellphone number
  delay(100);
   Serial1.println("GSM test message!");//the content of the message
  delay(100);
   Serial1.println((char)26);//the ASCII code of the ctrl+z is 26
  delay(100);
   Serial1.println();
}

///DialVoiceCall
///this function is to dial a voice call
void DialVoiceCall()
{
   Serial1.println("AT+SNFS=0");
 delay(100);
   Serial1.println("ATDxxxxxxxxxx;");//dial the number
//mySerial.println("ATD + +8613826558615;");//dial the number
  delay(100);
   Serial1.println();
}

///SubmitHttpRequest()
///this function is submit a http request
///attention:the time of delay is very important, it must be set enough
void SubmitHttpRequest()
{
   Serial1.println("AT+CSQ");
  delay(100);

  ShowSerialData();// this code is to show the data from gprs shield, in order to easily see the process of how the gprs shield submit a http request, and the following is for this purpose too.

   Serial1.println("AT+CGATT?");
  delay(100);

  ShowSerialData();

   Serial1.println("AT+SAPBR=3,1,\"CONTYPE\",\"GPRS\"");//setting the SAPBR, the connection type is using gprs
  delay(1000);

  ShowSerialData();

   Serial1.println("AT+SAPBR=3,1,\"APN\",\"CMNET\"");//setting the APN, the second need you fill in your local apn server
  delay(4000);

  ShowSerialData();

   Serial1.println("AT+SAPBR=1,1");//setting the SAPBR, for detail you can refer to the AT command mamual
  delay(2000);

  ShowSerialData();

   Serial1.println("AT+HTTPINIT"); //init the HTTP request

  delay(2000);
  ShowSerialData();

   Serial1.println("AT+HTTPPARA=\"URL\",\"www.google.com.hk\"");// setting the httppara, the second parameter is the website you want to access
  delay(1000);

  ShowSerialData();

   Serial1.println("AT+HTTPACTION=0");//submit the request
  delay(10000);//the delay is very important, the delay time is base on the return from the website, if the return datas are very large, the time required longer.
  //while(!mySerial.available());

  ShowSerialData();

   Serial1.println("AT+HTTPREAD");// read the data from the website you access
  delay(300);

  ShowSerialData();

   Serial1.println("");
  delay(100);
}

///send2Pachube()///
///this function is to send the sensor data to the pachube, you can see the new value in the pachube after execute this function///
void Send2Pachube()
{
   Serial1.println("AT+CGATT?");
  delay(100);

  ShowSerialData();

   Serial1.println("AT+CSTT=\"CMNET\"");//start task and setting the APN,
  delay(1000);

  ShowSerialData();

   Serial1.println("AT+CIICR");//bring up wireless connection
  delay(300);

  ShowSerialData();

   Serial1.println("AT+CIFSR");//get local IP adress
  delay(2000);

  ShowSerialData();

   Serial1.println("AT+CIPSPRT=0");
  delay(3000);

  ShowSerialData();

   Serial1.println("AT+CIPSTART=\"tcp\",\"api.cosm.com\",\"8081\"");//start up the connection
  delay(2000);

  ShowSerialData();

   Serial1.println("AT+CIPSEND");//begin send data to remote server
  delay(4000);
  ShowSerialData();
  String humidity = "1031";//these 4 line code are imitate the real sensor data, because the demo did't add other sensor, so using 4 string variable to replace.
  String moisture = "1242";//you can replace these four variable to the real sensor data in your project
  String temperature = "30";//
  String barometer = "60.56";//
   Serial1.print("{\"method\": \"put\",\"resource\": \"/feeds/42742/\",\"params\"");//here is the feed you apply from pachube
  delay(500);
  ShowSerialData();
  Serial1.print(": {},\"headers\": {\"X-PachubeApiKey\":");//in here, you should replace your pachubeapikey
  delay(500);
  ShowSerialData();
   Serial1.print(" \"_cXwr5LE8qW4a296O-cDwOUvfddFer5pGmaRigPsiO0");//pachubeapikey
  delay(500);
  ShowSerialData();
   Serial1.print("jEB9OjK-W6vej56j9ItaSlIac-hgbQjxExuveD95yc8BttXc");//pachubeapikey
  delay(500);
  ShowSerialData();
  Serial1.print("Z7_seZqLVjeCOmNbEXUva45t6FL8AxOcuNSsQS\"},\"body\":");
  delay(500);
  ShowSerialData();
   Serial1.print(" {\"version\": \"1.0.0\",\"datastreams\": ");
  delay(500);
  ShowSerialData();
   Serial1.println("[{\"id\": \"01\",\"current_value\": \"" + barometer + "\"},");
  delay(500);
  ShowSerialData();
   Serial1.println("{\"id\": \"02\",\"current_value\": \"" + humidity + "\"},");
  delay(500);
  ShowSerialData();
   Serial1.println("{\"id\": \"03\",\"current_value\": \"" + moisture + "\"},");
  delay(500);
  ShowSerialData();
   Serial1.println("{\"id\": \"04\",\"current_value\": \"" + temperature + "\"}]},\"token\": \"lee\"}");


  delay(500);
  ShowSerialData();

   Serial1.println((char)26);//sending
  delay(5000);//waitting for reply, important! the time is base on the condition of internet
   Serial1.println();

  ShowSerialData();

   Serial1.println("AT+CIPCLOSE");//close the connection
  delay(100);
  ShowSerialData();
}
//*******************************************************
  //GetSignalQuality();
//*******************************************************

void GetSignalQuality()
{

   Serial1.println("AT+CSQ");  //get the signal Quality
  delay(100);
  int k=0;
  while( Serial1.available()!=0)
  {
    SigQ[k]= Serial1.read();
    Serial.write(SigQ[k]);
    k+=1;
  }
}

void ShowSerialData()
{
  while( Serial1.available()!=0)
    Serial.write( Serial1.read());
}


