Lesson01 Introducing the ESP32 Display series and environment configuration
HMI (human-machine interface)
HMI (Human-Machine Interface) refers to the interface that interacts between humans and machines or equipment through software and hardware. It can help people easily grasp the running status of machines or equipment, control their execution actions, etc., making human-computer interaction simpler and more intuitive. HMI is commonly used in industrial and automation control systems to monitor and control production processes and equipment. The components of HMI include: display, touch screen, control buttons, indicator lights, alarm system, data transmission interface, etc. In terms of software, HMI is mainly composed of human-computer interaction interface, control logic program, communication protocol and so on. Users can control the running status of the equipment through the touch screen, control buttons and other operation interfaces, and at the same time observe the feedback information such as the running status of the equipment. The advantage of HMI is that it can make the control system more efficient, accurate, and reliable, while saving human resources and time costs. HMIs are also often used in home automation systems, such as smart home control panels, to allow occupants to control home devices more conveniently. In short, HMI is an interface that realizes the interaction between human and machine or equipment through the combination of software and hardware. It can help users better grasp and control the operating status of equipment, and improve work efficiency and performance.
Introduction to compatible hardware for this series of courses
ESP32 Terminal Series
A: ESP32 Terminal- 3.5inch RGB Display
This Elecrow terminal is a microcontroller based on the ESP32 master. It adopts Xtensa 32-bit LX7 dual-core processor with a main frequency of up to 240Mhz, supports 2.4GHz Wi-Fi and Bluetooth 5 (LE), and can easily handle common edge terminal device application scenarios, such as industrial control, agricultural production environment detection and processing, intelligent logistics monitoring, smart home scenarios and more. This terminal also has a 3.5-inch parallel RGB interface capacitive touch screen with a resolution of 320*480 to ensure perfect image output at a frame rate (FPS) of 60. On the back of this terminal, we have introduced 4 Crowtail interfaces, which can be used with our Crowtail series sensors, plug and play, and create more interesting projects quickly and conveniently. In addition, it is also equipped with an SD card slot for extended storage (SPI leads) and a buzzer function. It support ESP-IDF and Arduino IDE development, and is compatible with Python/Micropython/Arduino. It also support LVGL, which is the most popular free and open-source embedded graphics library to create beautiful UIs for any MCU, MPU and display type.
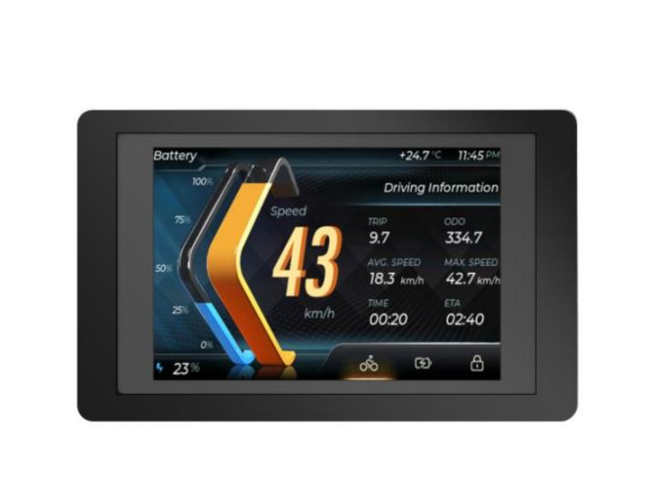

B :ESP32 Terminal- 3.5inch SPI Display
This handheld terminal is based on the ESP32 controller, equipped with a powerful ESP32-S3 chip, and supports 2.4GHz Wi-Fi and Bluetooth 5 (LE), providing more powerful computing and processing capabilities for IoT terminal applications. It is suitable for various scenarios, such as industrial IoT control terminals, smart agricultural terminals, personal smart home monitoring terminals, and personal DIY projects. Thanks to the scalability of the ESP32-S3-N16RB module, it can lead to various interfaces. It not only has Crowtail's digital port, analog port, UART, and IIC interface, but also integrates a MEMS microphone, camera interface, and buzzer function. It supports ESP-IDF and Arduino IDE development and is compatible with Python/Micropython/Arduino. It also supports LVGL, which is the most popular free and open-source embedded graphics library to create beautiful UIs for any MCU, MPU, and display type.
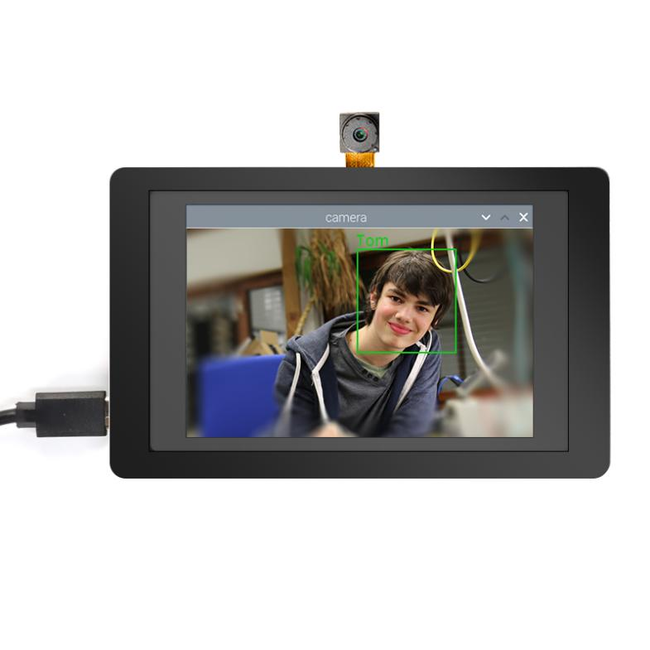

Wizee ESP32 Display Series
A: Wizee-ESP32 2.4 *Intelligent Touch Screen Wi-Fi&BLE 240*320 HMI Display**
*Elecrow Wizee ESP32 2.4-inch display is a powerful HMI touch screen with a 240*320 resolution LCD display. It uses the ESP32-WROOM-32 module as the main control processor, with a dual-core 32-bit LX6 microprocessor, integrated WiFi and Bluetooth wireless functions, a main frequency of up to 240MHz, providing powerful performance and versatile applications, suitable for IoT application devices and other scenes.
The Wizee ESP32 2.4-inch display is suitable for a wide range of scenes such as automotive HMI, medical equipment, industrial control, power, civil electronics, automation, GPS, new energy, and IoT application devices. Its various interfaces and expansion functions make it able to meet the needs of different fields, providing users with a more comprehensive solution.
Model: DIS03024H

B:Wizee-ESP32 2.8 *Intelligent Touch Screen Wi-Fi&BLE 240*320 HMI Display**
*Elecrow Wizee ESP32 2.8-inch display is a powerful HMI touch screen with a 240*320 resolution LCD display. It uses the ESP32-WROOM-32 module as the main control processor, with a dual-core 32-bit LX6 microprocessor, integrated WiFi and Bluetooth wireless functions, a main frequency of up to 240MHz, providing powerful performance and versatile applications, suitable for IoT application devices and other scenes.
Model: DIS03024H

C:Wizee-ESP32 3.5 *Intelligent Touch Screen Wi-Fi&BLE 320*480 HMI Display**
*Elecrow Wizee ESP32 3.5-inch display is a powerful HMI touch screen with a 320*480 resolution LCD display. It uses the ESP32-WROOM-32 module as the main control processor, with a dual-core 32-bit LX6 microprocessor, integrated WiFi and Bluetooth wireless functions, a main frequency of up to 240MHz, providing powerful performance and versatile applications, suitable for IoT application devices and other scenes.
Model: DIS03024H

D:Wizee-ESP32 4.3 *Intelligent Touch Screen Wi-Fi&BLE 480*272 HMI Display**
*Elecrow Wizee ESP32 4.3-inch display is a powerful HMI touch screen with a 480*272 resolution LCD display. It uses the ESP32-S3-WROOM-1-N4R2 module as the main control processor, with a dual-core 32-bit LX6 microprocessor, integrated WiFi and Bluetooth wireless functions, a main frequency of up to 240MHz,providing powerful performance and versatile applications, suitable for IoT application devices and other scenes.
Model: DIS03024H

Development environment configuration
1)SOFTWARE DOWNLOAD
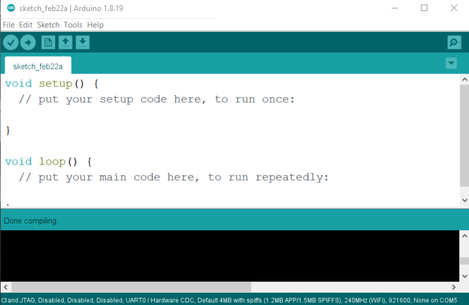
- 1.Please go to the official website https://www.arduino.cc/ to download the Arduino IDE development tool and download the corresponding library file, install the tool, click the start icon: open as shown in the figure:
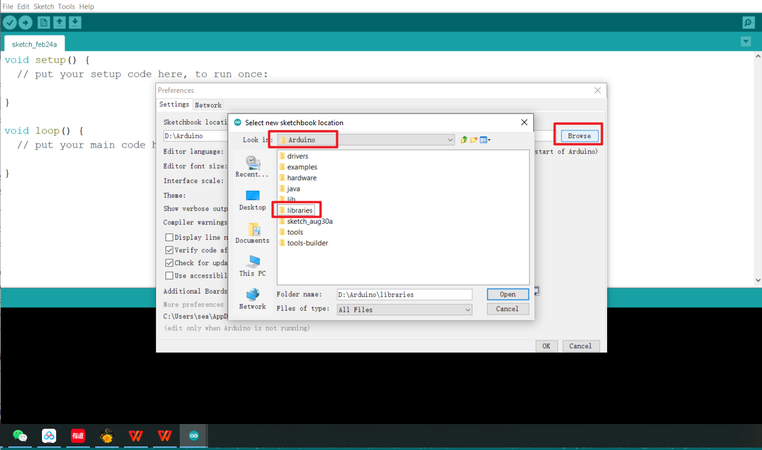
- 2.Click the "File" menu, select "Preferences" in the drop-down menu, and then the picture will appear: Unzip the downloaded library file and put it in the libraries folder.
- Add the ESP32 S3 URL as follows:
https://raw.githubusercontent.com/espressif/arduino-esp32/gh-pages/package_esp32_index.json 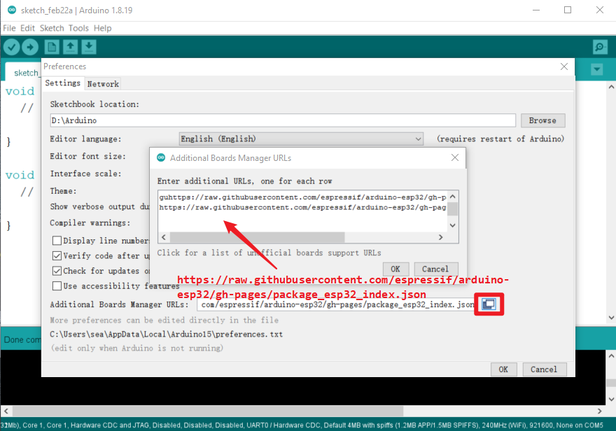
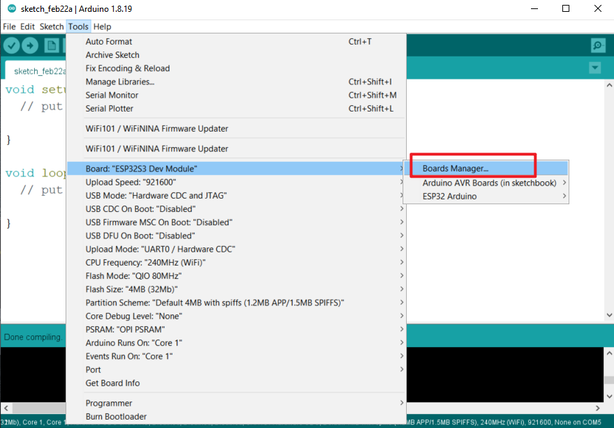
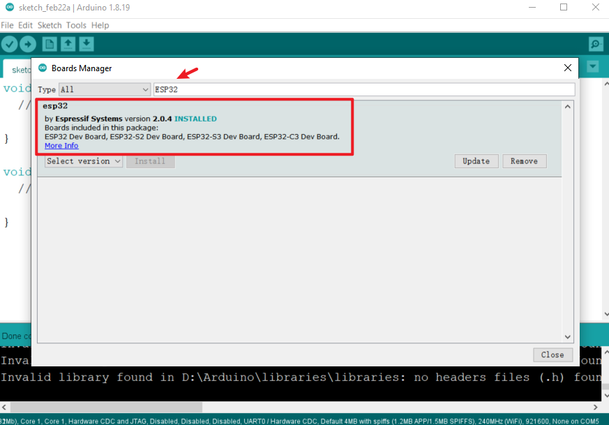
- The tool automatically downloads and updates the corresponding model, check the steps as shown in the figure:
2)SOFTWARE SETTING
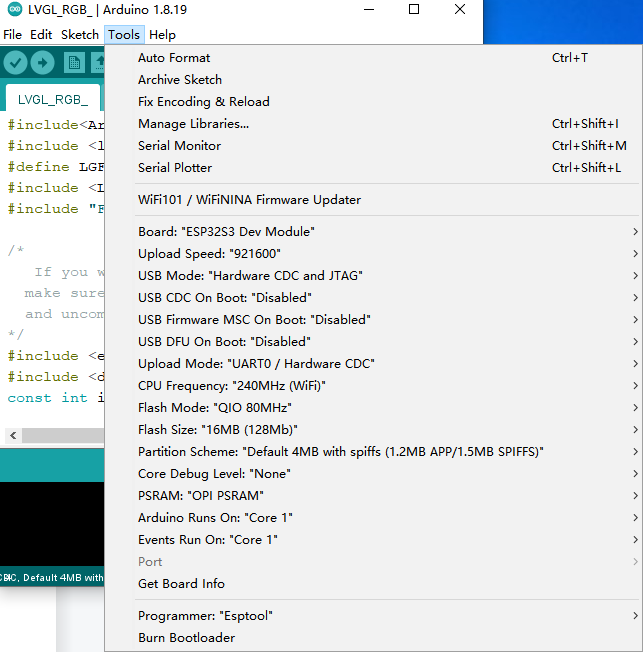
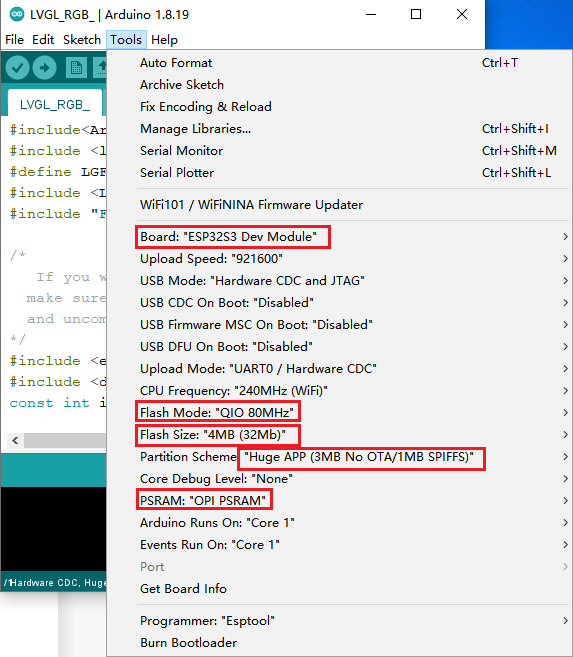
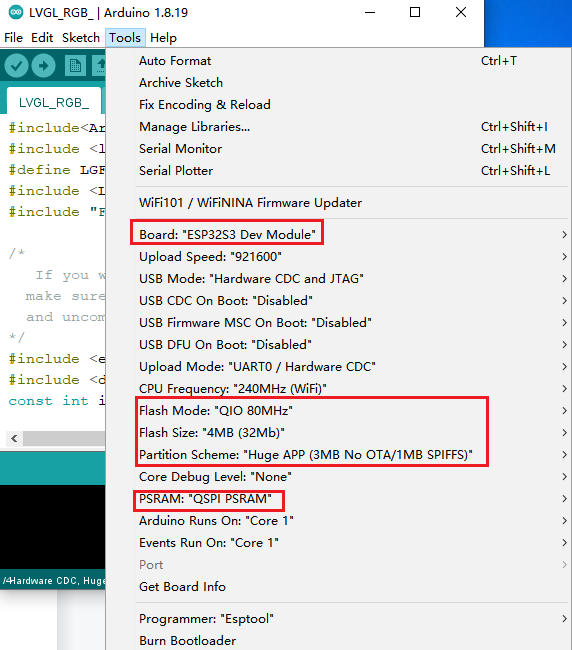
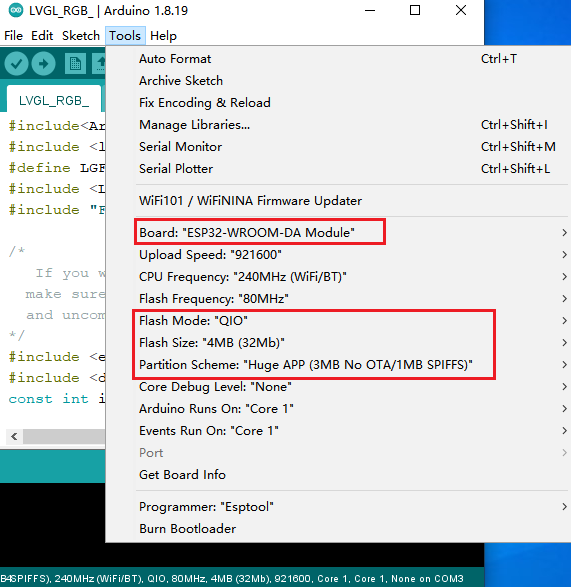
Here you need to choose different chips and settings according to different screen chips,set as shown:
- Warning:
If the CH340G driver is not installed on your PC, please install the CH340G driver first, or switch the SWITCH switch to the USB position and connect it with a USB cable.
3)Download process
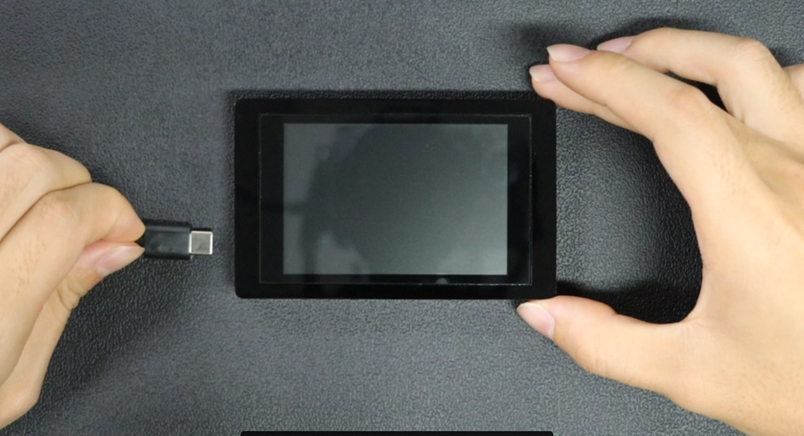
- 1.Connect the motherboard and computer through a USB to type-c data cable;
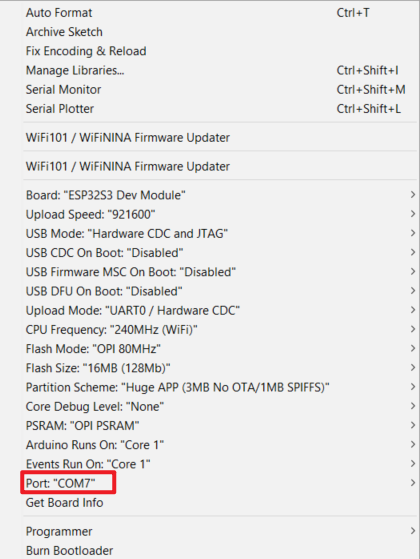
- 2.Click on the tool on the arduino software and select the corresponding serial port number;
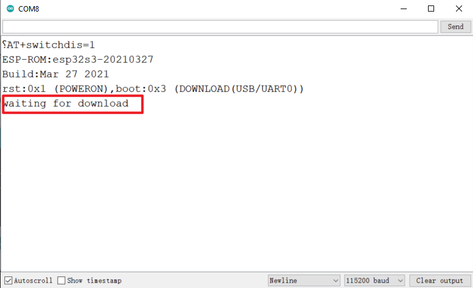
- 3.Click to open the serial port assistant, then click the boot button on the motherboard, and then press the reset button until the serial port assistant displays "waiting for download".
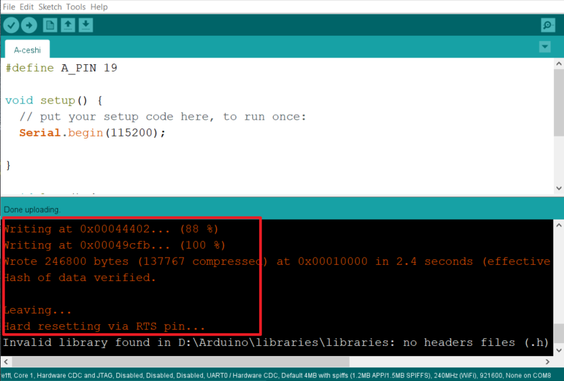
- 4.Click "upload" to upload the program to the ESP32 motherboard
- Until the prompt upload is successful, as shown in the figure:
Summarize
In the first lesson, we learned the basic concepts and applications of the Human Machine Interface (HMI), while introducing the related ESP32 terminal screen family. We also learned how to configure the Arduino environment, which is an important step in the development of ESP32, which provides us with a convenient development platform. By using these screens and the related software environment, we can easily develop various graphical interfaces and user interfaces. In the following lessons, we will learn more deeply how to use various software and ESP32 to build various applications, so as to achieve richer and more complex functions.
Resources
HMI Display Tutorial Contents
- Lesson01 Introducing the ESP32 Display series and environment configuration
- Lesson02 Start the ESP32 DISPLAY GUI drawing via LovyanGFX Graphics Library
- Lesson03 How to Display Pictures on ESP32 Boards
- Lesson04 LVGL Basics: How to install LVGL for ESP32 Displays
- Lesson05 Introduction to the 5 categories of LVGL GUI library Widgets
- Lesson06 Use Squareline Studio to start your 1st human machine interface project
- Lesson07 How to implement text information input with Squareline Studio
- Lesson08 How to make the menu and a progress bar with Squareline Studio
- Lesson09 How to make an analysis report on ESP32 Display
- Lesson10 Create a 3D Printer UI Project on ESP32 Display
- Lesson11 How to Make a Mixer Interface on ESP32 Display
- Lesson12 Make Your ESP32 Display the Lantern Control terminal
- Lesson13 DIY Electronic Control Terminal on ESP32 Display with Squareline Studio
- Lesson14 Create Car Control Screen on ESP32 Display: A Step-by-Step Guide
- Lesson15 Smart Agriculture Monitoring: IoT-Based Real-Time ESP32 Display Project
- Lesson16 ESP32 Display for Smart Home Central Control: A Home Automation Solution

