
Story
Project Idea
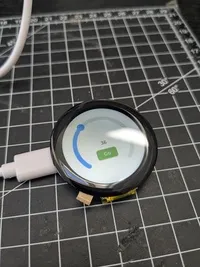
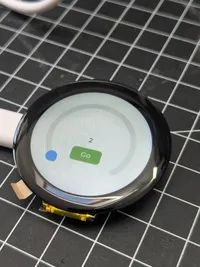
This project involves using an Elecrow 1.28-inch round display in combination with the LVGL (LittlevGL) graphics library and a custom Arduino setup. The goal is to create a timer application where the user can start the countdown using a button. The display shows an arc widget representing the timer's progress and a label indicating the remaining time.
The project also demonstrates handling touch input and I2C communication for additional control features, such as managing external I/O pins for peripheral interaction.


Setup Requirements
Info: The basic setup, including the configuration of
lv_conf.handUser_sSetup.hfor TFT_eSPI, has already been completed according to Elecrow's instructions.
https://www.elecrow.com/wiki/ESP32_1.28-inch_Round_Display_Tutorial.html#tutorial-on-arduino-ide
Code
global Variables
The following global variables are used in this project:
bool timerstart = false;
This variable tracks whether the timer has started or not. It is initially set tofalseand will be changed totruewhen the "Go" button is pressed, indicatin:g the start of the timer.unsigned long previousMillis = millis();
This variable stores the time at which the timer was last updated. It is used to track the passage of time and trigger updates every second (1000 ms).lv_obj_t* arc_obj;
This pointer refers to the arc object on the display, which visually represents the timer's countdown.lv_obj_t* label_obj;
This pointer refers to the label object that displays the current timer value on the screen.
Setup
In the setup(), the three LVGL widgets are created and configured as follows:
Arc Widget (Timer)
lv_obj_t *arc = lv_arc_create(lv_scr_act());
lv_obj_set_size(arc, 180, 180);
lv_arc_set_rotation(arc, 135);
lv_arc_set_bg_angles(arc, 0, 270);
lv_arc_set_value(arc, 10);
lv_obj_center(arc);
An arc (progress circle) is created on the screen. Its size is set to 180x180, and it's rotated by 135 degrees. The background angles of the arc are set from 0 to 270 degrees, and the initial value of the arc is set to 10. Finally, the arc is centered on the screen.
Label Widget (Text Display)
lv_obj_t *label = lv_label_create(arc);
lv_label_set_text(label, "Timer");
lv_obj_center(label);
lv_obj_align(label, LV_ALIGN_CENTER, 0, 0);
label_obj = label;
A label is created inside the arc object, displaying the text "Timer". It is centered, and the label is stored in the
label_objvariable for later use.Button Widget (Go Button)
lv_obj_t *btn = lv_btn_create(lv_scr_act());
lv_obj_set_style_bg_color(btn, lv_palette_main(LV_PALETTE_GREEN), 0);
lv_obj_set_size(btn, 60, 30);
lv_obj_align_to(btn, arc, LV_ALIGN_CENTER, 0, 35);

lv_obj_t *btn_label = lv_label_create(btn);
lv_label_set_text(btn_label, "Go");
lv_obj_center(btn_label);
A button is created on the screen with a green background. Its size is set to 60x30 pixels, and it's positioned below the arc, centered. Inside the button, a label with the text "Go" is created and centered.
Finally, event callbacks are added:
lv_obj_add_event_cb(arc, arc_changed, LV_EVENT_VALUE_CHANGED, label);
lv_obj_add_event_cb(btn, button_go_event, LV_EVENT_CLICKED, NULL);
The arc gets an event callback for changes in its value (
LV_EVENT_VALUE_CHANGED), and the button gets an event callback for clicks (LV_EVENT_CLICKED).
event handler
Here is an explanation of the two event handlers:
arc_changed(lv_event_t *e)
This event handler is triggered when the value of the arc widget changes (due to user interaction with the arc).
static void arc_changed(lv_event_t *e) {
  lv_event_code_t code = lv_event_get_code(e);              // Get the event code
  lv_obj_t *arc = (lv_obj_t *)lv_event_get_target(e);       // Object that generated the event (arc)
  lv_obj_t *label = (lv_obj_t *)lv_event_get_user_data(e);  // Label or other UI elements we want to update (Optional)

  arc_obj = arc;

  if (code == LV_EVENT_VALUE_CHANGED) {
    int timercnt = lv_arc_get_value(arc);                    // Get the new value of the arc
    lv_label_set_text_fmt(label, "%d", timercnt);            // Update the label text with the new value
  }
}
lv_event_get_code(e): Retrieves the event code (e.g., whether it's a value change, button click, etc.).lv_event_get_target(e): Gets the object that triggered the event, in this case, the arc widget.lv_event_get_user_data(e): Gets any additional data associated with the event. Here, it's used to pass the label widget, which will be updated with the arc's value.lv_arc_get_value(arc): Retrieves the current value of the arc widget.lv_label_set_text_fmt(label, "%d", timercnt): Updates the label with the new value of the arc.
This handler updates the label with the current value of the arc when the arc's value changes.
button_go_event(lv_event_t *e)
This event handler is triggered when the "Go" button is clicked.
static void button_go_event(lv_event_t *e) {
    LV_LOG_USER("lets go");
    timerstart = true;
}
LV_LOG_USER("lets go"): Logs a user message to indicate the button click event occurred.timerstart = true: Sets thetimerstartflag totrue, which presumably controls the starting of a timer or some other functionality in the application.
This handler simply logs a message and sets the timerstart flag to true when the button is clicked.
Loop
Here’s an explanation of the code in the loop:
unsigned long currentMillis = millis();
if (timerstart) {
  if (currentMillis - previousMillis >= 1000) {
    previousMillis = currentMillis;
    int timercnt = lv_arc_get_value(arc_obj);  // Get the current value of the arc

    if (timercnt > 0) {
      decrement_timer();  // Decrement the timer value
    }
    else if(timercnt <= 0) {
      // When the timer reaches 0, execute the following actions:
      for (int i = 0; i < 5; i++) {
        set_pin_io(0, true);  // Set the pin to high (turn on the hardware)

        tft.fillScreen(TFT_RED);  // Fill the screen with red color
        delay(500);  // Wait for 500 milliseconds

        set_pin_io(0, false);  // Set the pin to low (turn off the hardware)
        tft.fillScreen(TFT_BLACK);  // Fill the screen with black color
        delay(500);  // Wait for 500 milliseconds
      }

      esp_restart();  // Restart the ESP device
    }
  }
}
Explanation:
millis(): This function returns the number of milliseconds since the program started. It is used to create non-blocking delays, which ensures that the program can continue running other code while waiting for a timeout.currentMillis - previousMillis >= 1000: This checks if 1 second has passed since the last check. If it has, thepreviousMillisvariable is updated to the current time, and the timer's value is checked.lv_arc_get_value(arc_obj): Retrieves the current value from the arc widget.decrement_timer(): This function is assumed to decrement the timer's value by 1 (not shown here). It would be used to reduce the timer count as time passes.- When the timer reaches 0 (or less):
- A loop runs 5 times.
set_pin_io(0, true)turns the pin (possibly a LED or relay) on.tft.fillScreen(TFT_RED)fills the screen with a red color.delay(500)waits for 500 milliseconds.set_pin_io(0, false)turns the pin off.tft.fillScreen(TFT_BLACK)changes the screen to black.esp_restart()restarts the ESP device once the blinking sequence completes.
This loop controls the timer countdown and, when the timer reaches 0, triggers a blinking red and black screen sequence with hardware control (through the pin), followed by a device restart.
The decrement_timer() function is responsible for decrementing the value of the arc widget and updating the corresponding label. Here's how it works:
void decrement_timer() {
  int current_value = lv_arc_get_value(arc_obj);  // Get the current value of the arc widget
  current_value--;  // Decrement the value by 1
  lv_arc_set_value(arc_obj, current_value);  // Set the new value back to the arc widget
  lv_label_set_text(label_obj, String(current_value).c_str());  // Update the label with the new value
}
Explanation:
lv_arc_get_value(arc_obj): This function retrieves the current value of the arc widget (arc_obj), which represents the timer value in this case.current_value--: Decreases the value of the timer by 1.lv_arc_set_value(arc_obj, current_value): Sets the updated value back to the arc widget, which visually represents the timer.lv_label_set_text(label_obj, String(current_value).c_str()): Updates the label (label_obj) with the new value of the timer. TheString(current_value).c_str()converts the integercurrent_valueto a C-string to be displayed as text on the label.
This function ensures that both the arc widget and its label stay in sync as the timer decreases.