
Story
In this tutorial you will learn how to build a Parking Sensor with the TOF10120 IR Laser Distance Sensor and a CrowPanel 3.5" ESP32 Display. A parking sensor helps drivers avoid obstacles while parking, for instance, by measuring the distance between the car and the garage wall.
The short video clip below demonstrates the parking sensor. It shows how distances are measured in centimetres, and how to set the distance for the proximity alarm (red color):

The TOF10120 sensor uses time-of-flight technology. It emits an infrared laser beam and measures how long it takes for the beam to return after hitting an object. This time is converted into a distance.
The ESP32 microcontroller within CrowPanel Display then processes the data from the TOF10120 sensor. It calculates the distance and prepares the information for display.
Finally, the CrowPanel TFT display shows the distance in real-time. It provides the visual output, allowing the driver to see how far they are from obstacles.
In the next view sections you will learn how to connect the TOF10120 sensor to the CrowPanel Display and how to program it to display distance information. Let's start with the required parts
Features of the CrowPanel 3.5" ESP32 Display
The CrowPanel 3.5" ESP32 Display is a resistive touch screen with a 480*320 resolution TFT display and a built-in ESP32-WROVER-B as control processor. You can get the display with an acrylic shell (see picture below), which means you don't have build a housing yourself.

Beyond that, the board comes with a TF card slot, an UART interface, an I2C interface, a speaker interface, a battery connector with charging capability and a small GPIO port with two GPIO pins. See the pinout below:
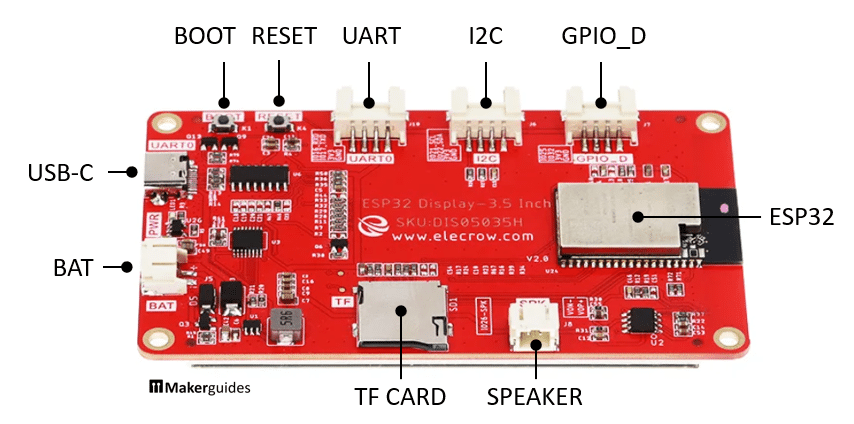
The following table lists which GPIO pins are assigned to which of the three IO interfaces.
| GPIO_D | IO25; IO32 |
| UART | RX(IO16); TX(IO17) |
| I2C | SDA(IO22); SCL(IO21) |
The board can be powered via the USB port (5V, 2A) or by connecting a standard 3.7V LiPo battery to the BAT connector. Just watch out for the polarity of the connector and the battery. If the USB cable and the battery are connected at the same time, the board will charge the battery (maximum charging current is 500mA).
You can program the board using various development environments such as Arduino IDE, Espressif IDF, Lua RTOS, and Micro Python, and it is compatible with the LVGL graphics library. However, in this tutorial we will use the Arduino IDE and the TFT_eSPI graphics library.
Features of the TOF10120
The TOF10120 Time-of-Flight Distance Sensor is a is a very small (10mm x 13mm), high-precision sensor that uses infrared light to measure distances.

It is based on the Time-of-Flight (ToF) principle, where the sensor emits light pulses and measures the time it takes for the light to reflect back to calculate the distance. The TOF10120 has a range of up to 180 cm and operates at a wavelength of 940nm. The picture below shows the cone of the laser LED that emits the light pulse and the view cone of the detector that registers the reflected light.

The TOF10120 operates on 3V to 5V, with a low, average current consumption of only 35 mA. The following list summarizes its main features:
- Working range: 100-1800mm
- Measurement error: up to 5%
- High speed ranging: max 30ms
- Communication interface: UART / I2C
- UART transmission parameters: 9600 8n1
- Wavelength: 940 nm
- Field of view: 25°
- Ambient light immunity: 50k lux
- Voltage range: 3V to 5V
- Average current consumption: 35 mA
The above specification and the datasheet state that the minimum distance that can be measured is 100mm. However, I found that you actually can get measurements as close as 10mm and as far as 2000mm but under 30mm the readings become very inaccurate.
The TOF10120 communicates with microcontrollers via an I2C or UART interface. The picture below shows the pinout. SDA and SCL are for the I2C interface and RxD and TxD for UART communication.

In the next section you will learn how to connect the TOF10120 to the CrowPanel Display.
Connecting TOF10120 to the CrowPanel Display
The CrowPanel Display has an I2C port and comes with a color coded connector. Ground is black, 3.3V power supply is red, SCL is white (gray) and SDA is yellow. Connect Ground to pin 1, 3.3V to pin 2, SDA to pin 5 and SCL to pin 6 of the TOF10120 as shown below:

Note that pin 3 and 4 (RxD, TxD) of the TOF10120 are not connected, since we are not using the UART interface but I2C.
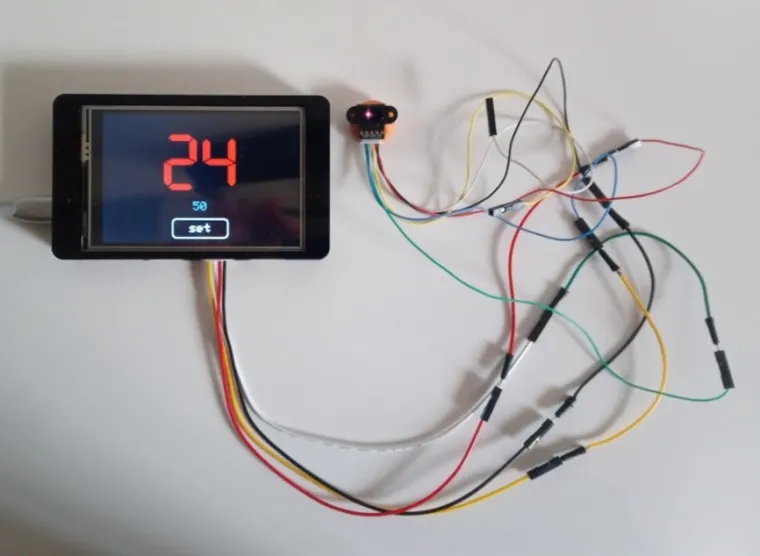
The picture below shows the, admittedly messy, wiring of the TOF10120 with CrowPanel using the provided connectors and some Dupont cables.

The good news is, you don't need a breadboard or have to solder any wires.
Testing the TOF10120 Sensor
Before implementing anything complex, we better test that the sensor is correctly connected and works. For that, we first need to install a library to read distance measurements from the TOF10120 sensor.
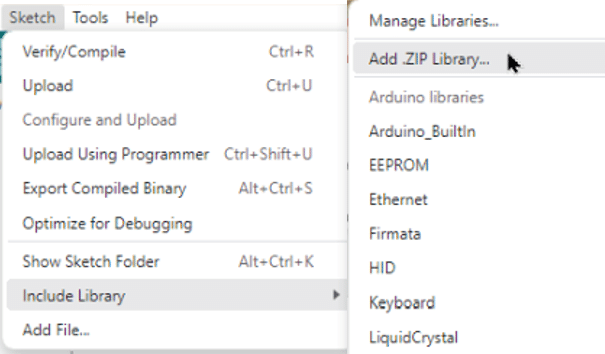
Install TOF10120 library
To install the TOF10120 library go to the tof10120_arduino_lib repo here and click on the green "Code" button. Then click on "Download Zip" as show below:

In the Arduino IDE create the following test code:
#include "TOF10120.h"

TOF10120 sensor = TOF10120();

void setup() {
  Serial.begin(9600);
  sensor.init();
}

void loop() {
  Serial.print("distance:");
  Serial.println(sensor.distance());
  delay(100);
}
Then go "Sketch" -> "Include Library" -> "Add .Zip Library.." and select the "tof10120_arduino_lib-main.zip" file you just downloaded before:
The test code is very simple. First it includes the TOF10120 library and creates the TOF10120 sensor object. In the setup() function the sensor then gets initialized and in the loop() function we finally call sensor.distance() to read the distance measured by the sensor.
Run test code for TOF10120 Sensor
In the Arduino IDE select "ESP32 Dev Module" as board and make sure the CrowPanel Display is connected to the USB port and visible in the Arduino IDE.

Now upload the code to your CrowPanel Display and you should see distance values printed to the Serial Monitor. If there is no object in front of the sensor, you will see a distance of 2000mm printed and if the sensor was not found you will see a -1.

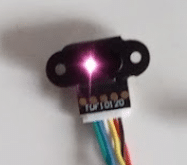
If you have issues and the sensor doesn't seem to work make sure that the wiring is correct and that the correct SDA and SCL pins are used. You can also check the laser diode of the sensor by taking a picture with a digital camera (mobile phone). While IR light is invisible to the human eye, the camera can see it. The picture below shows the TOF10120 with the IR diode clearly illuminated:
If the TOF10120 sensor works and you see distance measurements displayed, we can start with the project structure for the main code.
Create Project Structure
In this section we create the project structure and the setup for the TFT_eSPI library that is needed to control the TFT display.
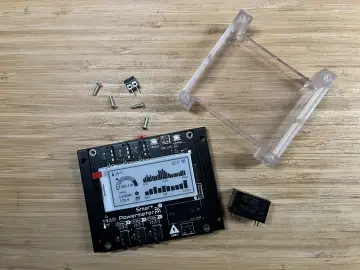
Open your Arduino IDE and create a project "parking_sensor_display" and save it (Save As ...). This will create a folder "parking_sensor_display" with the file "parking_sensor_display.ino" in it. In this folder create another file named "tft_setup.h". Your project folder should look like this

and in your Arduino IDE you should now have two tabs named "parking_sensor_display.ino", and "tft_setup.h".

Click on the "tft_setup.h" tab to open the file and copy the following code into it:
// tft_setup.h
#define ILI9488_DRIVER
#define TFT_HEIGHT  480
#define TFT_WIDTH   320

#define TFT_BACKLIGHT_ON HIGH
#define TFT_BL   27
#define TFT_MISO 12
#define TFT_MOSI 13
#define TFT_SCLK 14
#define TFT_CS   15
#define TFT_DC    2
#define TFT_RST  -1
#define TOUCH_CS 33

#define SPI_FREQUENCY        27000000
#define SPI_TOUCH_FREQUENCY   2500000
#define SPI_READ_FREQUENCY   16000000

#define LOAD_GLCD   // Font 1. Original Adafruit 8 pixel font needs ~1820 bytes in FLASH
#define LOAD_FONT2  // Font 2. Small 16 pixel high font, needs ~3534 bytes in FLASH, 96 characters
#define LOAD_FONT4  // Font 4. Medium 26 pixel high font, needs ~5848 bytes in FLASH, 96 characters
#define LOAD_FONT6  // Font 6. Large 48 pixel font, needs ~2666 bytes in FLASH, only characters 1234567890:-.apm
#define LOAD_FONT7  // Font 7. 7 segment 48 pixel font, needs ~2438 bytes in FLASH, only characters 1234567890:-.
#define LOAD_FONT8  // Font 8. Large 75 pixel font needs ~3256 bytes in FLASH, only characters 1234567890:-.
#define LOAD_GFXFF  // FreeFonts. Include access to the 48 Adafruit_GFX free fonts FF1 to FF48 and custom fonts
This code tells the TFT_eSPI library, which display are we using. Specifically, we let the library know the dimensions of the display (TFT_WIDTH, TFT_WIDTH), its display driver (ILI9488_DRIVER), which SPI pins are used to control it and what fonts to load. Without these settings, you will not be able to show anything on the display.
For more detailed information have a look at the tutorial CrowPanel 2.8" ESP32 Display : Easy Setup Guide. There we explain how to setup the 2.8" Display. But the steps and descriptions apply to the 3.5" Display in the same way. Just the settings for the screen dimensions and driver are different.
Calibrating Touchscreen
The CrowPanel 3.5" Display comes with a resistive touch screen that you need to calibrate first, before you can used it with the TFT_eSPI library. Copy the code below into the "parking_sensor_display.ino" file, compile it and upload it to the CrowPanel 3.5" Display. As before, use the ESP32 Dev Module as board.
#include "tft_setup.h"
#include "TFT_eSPI.h"

TFT_eSPI tft = TFT_eSPI();

void setup() {
  Serial.begin(9600);
  tft.begin();
  tft.setRotation(3);
}

void loop() {
  uint16_t cal[5];
  tft.fillScreen(TFT_BLACK);
  tft.setCursor(20, 0);
  tft.setTextFont(2);
  tft.setTextSize(1);
  tft.setTextColor(TFT_WHITE, TFT_BLACK);
  tft.print("Touch corners ... ");
  tft.calibrateTouch(cal, TFT_MAGENTA, TFT_BLACK, 15);
  tft.println("done.");

  Serial.printf("cal: {%d, %d, %d, %d, %d}\n",
                cal[0], cal[1], cal[2], cal[3], cal[4]);
  delay(10000);
}
When the code is running the displays shows an arrow and tells you to touch the corner it points to. This will be repeated for the other three corners as well. Use the little yellow pen that comes with Display to do this and try to touch the corners as precisely as possible.

At the end of the calibration process the code prints out the 5 calibration parameters (corner coordinates and screen orientation) to the Serial monitor. You should see something like this:
cal: { 273, 3534, 286, 3615, 4 }
Copy the parameters somewhere, since you will need them in the main code. The calibration repeats itself every 10 seconds, so you can have several tries to get the most accurate parameters. For more detailed information on the calibration process have a look the CrowPanel 2.8" ESP32 Display : Easy Setup Guide tutorial.
Code for Parking Sensor
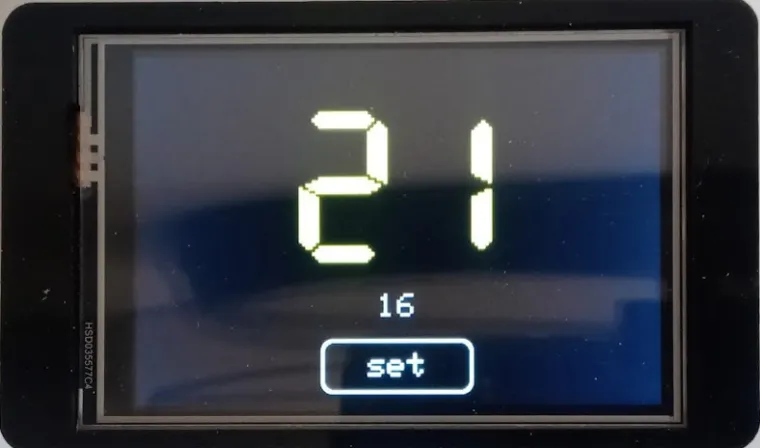
In this section, we write the main code for the parking sensor system using the CrowPanel ESP32 display and the TOF10120 laser distance sensor. The system continuously measures the distance to an object and displays it on the screen, changing colors based on the proximity of the object. A button on the display allows the user to set a minimum distance threshold.
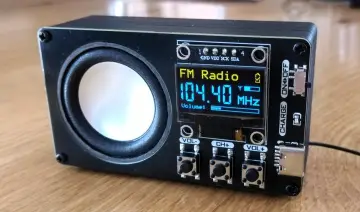
The following screenshot shows the main elements of the user interface:

Have quick look at the complete code first, and then we dive into its details:
#include "stdarg.h"
#include "tft_setup.h"
#include "TFT_eSPI.h"
#include "TOF10120.h"

TFT_eSPI tft = TFT_eSPI();
TOF10120 sensor = TOF10120();

uint16_t cal[5] = { 273, 3534, 286, 3615, 4 };
int minDist = 50;


int getDistance() {
  return sensor.distance() / 10;
}

void drawString(int16_t x, int16_t y, uint8_t font, const char* format, ...) {
  static char buf[64];
  va_list args;
  va_start(args, format);
  vsnprintf(buf, 64, format, args);
  tft.setTextDatum(MC_DATUM);
  tft.drawString(buf, x, y, font);
}

void drawDistance() {
  static char buf[32];
  int dist = getDistance();
  uint32_t color = TFT_GREEN;
  if (dist < minDist * 1.5) color = TFT_YELLOW;
  if (dist < minDist) color = TFT_RED;
  tft.setTextColor(color, TFT_BLACK);
  tft.setTextSize(3);
  drawString(tft.width() / 2, 120, 7, "   %d   ", dist);
}

void drawButton() {
  static bool oldTouch = true;
  int cx = tft.width() / 2;
  int bw = 140, bh = 50, bt = 3;
  int x = cx - bw / 2, y = tft.height() - bh - 10;

  uint16_t tx, ty;
  bool isTouch = tft.getTouch(&tx, &ty);
  isTouch = isTouch && (abs(tx - cx) < bw / 2) && (ty > y);
  if (isTouch == oldTouch) return;
  oldTouch = isTouch;

  tft.fillSmoothRoundRect(x, y, bw, bh, 10, TFT_WHITE);
  if (isTouch) {
    tft.setTextColor(TFT_BLACK, TFT_WHITE, true);
    minDist = getDistance();
  } else {
    tft.fillSmoothRoundRect(x + bt, y + bt, bw - 2 * bt, bh - 2 * bt, 10, TFT_BLACK);
    tft.setTextColor(TFT_WHITE, TFT_BLACK, true);
  }
  drawString(cx, y + bh / 2, 1, "set");
  tft.setTextColor(TFT_SILVER, TFT_BLACK, true);
  drawString(cx, y - 30, 1, "  %d  ", minDist);
}

void setup(void) {
  sensor.init();
  tft.init();
  tft.setRotation(3);
  tft.fillScreen(TFT_BLACK);
}

void loop() {
  drawDistance();
  drawButton();
  delay(100);
}
Let's break down the code into its components for a better understanding.
Library Inclusions
We start by including the necessary libraries for our project. These libraries provide the functionality needed to interact with the display and the distance sensor.
#include "stdarg.h"
#include "tft_setup.h"
#include "TFT_eSPI.h"
#include "TOF10120.h"
Object Initialization
Next, we create instances of the display and the sensor. The TFT_eSPI object tft is used to control the display, while the TOF10120 object sensor is used to interact with the laser distance sensor.
TFT_eSPI tft = TFT_eSPI();
TOF10120 sensor = TOF10120();
Calibration and Minimum Distance
We define an array cal for calibration values and an integer minDist that sets the minimum distance threshold for the sensor. This threshold will be used to change the color of the displayed distance based on how close an object is. The calibration values come from the touch screen calibration process described before.
uint16_t cal[5] = { 273, 3534, 286, 3615, 4 };
int minDist = 50;
Get Distance Function
The getDistance() function retrieves the distance measured by the sensor and converts it from millimeters to centimeters by dividing it by 10.
int getDistance() {
  return sensor.distance() / 10;
}
Draw String Function
The drawString() function is a utility to display formatted text on the screen. It uses variable arguments to format the string and then draws it centred at specified coordinates with a specified font.
void drawString(int16_t x, int16_t y, uint8_t font, const char* format, ...) {
  static char buf[64];
  va_list args;
  va_start(args, format);
  vsnprintf(buf, 64, format, args);
  tft.setTextDatum(MC_DATUM);
  tft.drawString(buf, x, y, font);
}
Draw Distance Function
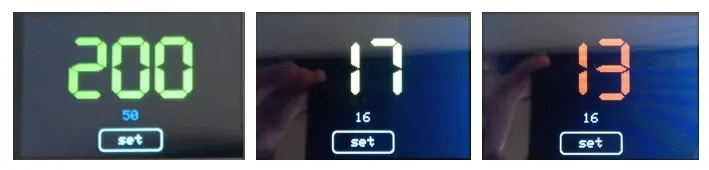
In the drawDistance() function, we first get the current distance using getDistance(). We then determine the color of the text based on the distance: green for safe distances, yellow for caution, and red for danger.
void drawDistance() {
  static char buf[32];
  int dist = getDistance();

  uint32_t color = TFT_GREEN;
  if (dist < minDist * 1.5) color = TFT_YELLOW;
  if (dist < minDist) color = TFT_RED;

  tft.setTextColor(color, TFT_BLACK);
  tft.setTextSize(3);
  drawString(tft.width() / 2, 120, 7, "   %d   ", dist);
}
Finally, we display the distance in a large font on the screen. The following three screen shots show three distances (in centimetre) in the three different colors:

Draw Button Function
The drawButton() function handles the display of a button on the screen. It checks for touch i
void drawButton() {
  static bool oldTouch = true;
  int cx = tft.width() / 2;
  int bw = 140, bh = 50, bt = 3;
  int x = cx - bw / 2, y = tft.height() - bh - 10;

  uint16_t tx, ty;
  bool isTouch = tft.getTouch(&tx, &ty);
  isTouch = isTouch && (abs(tx - cx) < bw / 2) && (ty > y);
  if (isTouch == oldTouch) return;
  oldTouch = isTouch;

  tft.fillSmoothRoundRect(x, y, bw, bh, 10, TFT_WHITE);
  if (isTouch) {
    tft.setTextColor(TFT_BLACK, TFT_WHITE, true);
    minDist = getDistance();
  } else {
    tft.fillSmoothRoundRect(x + bt, y + bt, bw - 2 * bt, bh - 2 * bt, 10, TFT_BLACK);
    tft.setTextColor(TFT_WHITE, TFT_BLACK, true);
  }
  drawString(cx, y + bh / 2, 1, "set");
  tft.setTextColor(TFT_SILVER, TFT_BLACK, true);
  drawString(cx, y - 30, 1, "  %d  ", minDist);
}
The button's appearance changes based on whether it is pressed or not. The picture below shows the "set" button when not pressed:

Setup Function
In the setup() function, we initialize the sensor and the display
void setup(void) {
  sensor.init();
  tft.init();
  tft.setRotation(3);
  tft.fillScreen(TFT_BLACK);
}
Loop Function
Finally, the loop() function continuously calls drawDistance() and drawButton() to update the display with the current distance and handle button interactions. A short delay is added to prevent excessive updates.
void loop() {
  drawDistance();
  drawButton();
  delay(100);
}
Conclusions
In this tutorial you learned how to build a Parking Sensor with the TOF10120 IR Laser Distance Sensor and a CrowPanel 3.5" ESP32 Display. There are many possible extensions to this project. For instance, you could connect a bright LED to the GPIO port and activate it, when the minimum distance is reached.
Similarly, you could use the speaker port of the CrowPanel Display to sound an alarm, if an object gets too close. There is actually a RP2040 based CrowPanel Pico 4.3" Display that has a built in buzzer you could use instead, or of course, you connect a buzzer to the GPIO port. See the Scribble on CrowPanel Pico 4.3" Display for more details.
Finally, instead of the TOF10120 you could use other infrared distance sensors such as the common GP2Y0A710K0F or the GP2Y0A21YK0F. Also commonly used is the ultrasonic distance sensor HC-SR04 hat use sound waves to measure distance. However, IR laser sensors are more precise and have a longer range compared to ultrasonic sensors.
If you have any questions feel free to leave them in the comment section.
Happy Tinkering ; )