Story
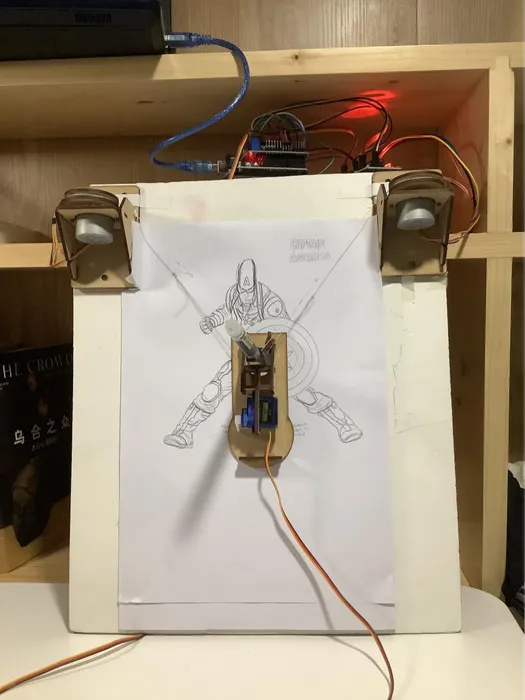
In our lives, art is everywhere, even cold tools like robots can bring us a lot of fun about art. When I saw Euphy's video, I saw a new possibility of drawing robots, it was great to see them turn something virtual into a real entity, it can automatically hold a pen and draw on the surface of paper or any object, and the platform for drawing is not only limited to the horizontal plane, you can also try it on the wall.
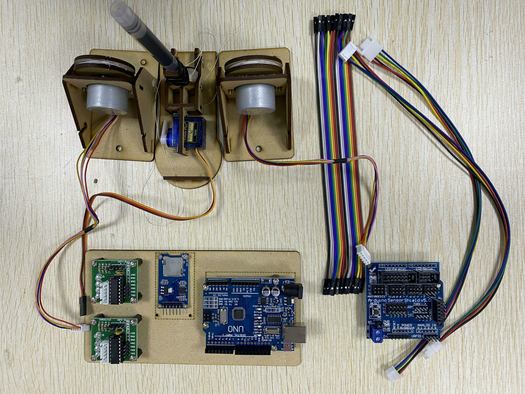
The wire pulling wall painting machine is a very early project, but there has been no better solution for machine reasons. Recently, we have elaborated a rather excellent solution to the problem of stepper motor mount and pen holder. Stepper motor using 28byj, small size, easy wiring, simple procedures, no driver, welding, power supply, and other issues, can be used by Arduino direct power supply. Motor and motherboard integrated with a base, both sides have a winding frame that can be pasted on any wall, the upper corner of the drawing board.
Let's get started and see how to archive such an amazing project!
Step 1: Bill of Materials
The project is composed of the following components:
Motor bracket x 1
28BYJ-48 Stepper motor driver board x 2
SG90 Servo motor x 2
Micro SD card adapter x 1
Arduino sensor shield x 1
Pen up steering gear x 1
Wire spool x 2
Sling x 1
Jumper Wire
Pen x 1
Step 2: Base Bracket Assembly
The first step is simple, first, we find 12 large head screws and 12 brass posts, screw the large head screws in from the back and fix all the brass posts
then we installed the motor driver board in order for the Arduino to drive the stepper motor. The motor driver board is required because the Arduino's output pins do not provide enough power directly to the stepper motor, which requires a 5V power supply to operate.
Lastly, install the two Arduino UNOs on the brass posts and finally fix the SD/TF card reader on the top with the smallest screws.
Step 3: Stepper Motor Bracket Assembly
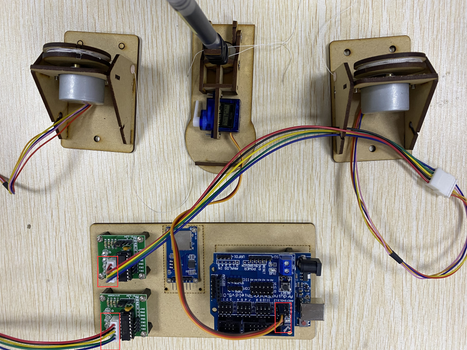
There is a lot to do in this step, but it is not difficult, it just requires more patience. There are 3 steps to motor installation, which I would like to express as follows.
1. Mounting the motor
-1. Prepare a motor stand by breaking it off and then reassemble the board according to the second diagram.
-2. Downwards, fix the riser handpiece with screws and then install the motor.
2. Making the spool
-1. Tie the cable loop to the end of the cable, pull the cable into the gap on the back of the power cable and then check the cable around the spool.
-2. At the other end of the pull cable, tie a thick cord that can be used for the pen in the next step. The cover plate then covers the hole in the bracket plate and is fitted into the hole in the bracket.
-3. Use the screw holes to mount the motor bracket on the end of the drawing board or wall so that it is at the same level.
Note:
When winding the wire, remember to wind the left bobbin clockwise and the right bobbin counterclockwise.
3. Pen holder assembly
-1. First, we need to break the barrel-shaped pen that needs to be installed, insert the exit cargo screw at the large end through the mouth and tighten it.
-2. After this, we install the drone. As shown in the picture, the centre of gravity is at the very centre after installation for smoother running.
-3. Next, use the large end to secure the left and right side panels and the shaft cutout. Remember that the screws that rotate the shaft should not be tightened.
-4. Once you have determined the position of the pen, tie it off with a string. When adjusting the position of the pen, it is perfect for the ultimate drawing quality that allows the pen tip to touch. Hold the pen holder as well as possible.
So far, the motor bracket has been completed.
Step 4: Connection
In order to plug in the steering gear equipment, we insert the shield board on the UNO and pay attention to align the shield board pins with the wiring holes of the UNO.
1.Pull wire stepping motor M1 and M2: four signal lines in1, in2, in3, and in4 correspond to Arduino 2, 3, 5, and 6 respectively, and the other side 7, 8, 9, and 10 respectively. The power line is connected to VCC for + and GND for -. The Stepper motor control board has a dedicated line connected to the motor, anti dummy plug will not be wrong.
2.The pen lifting steering gear can be connected to 13. The steering gear cable is brown GND, red VCC, and yellow is the signal. If you use an SD card reader, you can connect to the A0 port.
Notes:
-1. (optional) TF, SD card reader: CS connected to 4, MoSi connected to 11, miso connected to 12, SCK connected to 13#,(if the pen lift steering gear is changed from 13 to other ports such as A0, the program also needs to be changed accordingly. See the program notes.)VCC is +, GND is - (G and V can be connected to any group of G and V interfaces of shield board), 3.3V is not connected(VCC, 5V, + refer to the positive pole of the power supply. G, GND, - all negative)
-2.SD or TF card reader module does not support SDXC above standard card, please choose a relatively old small capacity card, will have better performance compatibility. Generally, cards of 16g and below are formatted in FAT32 format, not NTFS or exFAT format, and can be used for Use. Some TF to SD cardholders may also have incompatibility problems. If the only TF card is available, the TF reader module is recommended.
Step 5: Programing
We will provide you with the corresponding code, but there is still a part of the code that needs to be modified according to your actual size, the part of the code that needs to be modified is as follows.
1. First run 2Steper.ino, the function of this program is to make the stepper motor work and draw a pendulum graph, it is relatively simple, just adjust the number of revolutions to change the pattern. The position may be much worse, and when running the program directly, the pendulum arm may turn to a completely irrelevant position, which is troublesome.
2. The main program is WallDrawDemo.ino, which will draw a few patterns for testing. Do not install the pen yet (the cord holder can be hung on the pen stand), run the program, let the pen stand run empty for a while, and see if the running range, whether within the paper range. If it is beyond, the parameters still need to be adjusted, the specific efficacy of several parameters see the program notes The effects of several parameters are described in the program notes.
3.The next step will be uploading our code to the Arduino board, the code can be found at the bottom of this instructable, make sure that you choose Arduino Uno regarding the device you use (Arduino Uno) in the ArduinoIDE.
If you are not familiar with Arduino, follow the following steps:
-1. Connect your Arduino board by USB to your computer
-2. Open Arduino IDE (if you don't have it, make sure to download it from their official website)
-3. Open the project we gave at the bottom of the Instructable page
-4. On top of the Arduino IDE choose "Tools > Board > Arduino Uno,and select the port number COM corresponding to the board( (please install the Ch340 driver for unrecognized devices)
-5. Click the V sign to verify the code and then right next to it the arrow-right button to push the code!
Step 6: Upload the Images You Want
When you have finished debugging the previous steps, you can upload your own desired image for drawing.
How to upload your image?
Not any photo can be drawn, only vector drawings can be drawn. Fortunately, some photos can be converted into vector drawings by software. (You can use Coreldraw, Inkscape, and much other software processing) or take a simple vector drawing to try first.
1. Vector drawings should be converted into gcode files. Gcode is a text file that can be opened and edited with a writing tablet. Before using it, you can browse the values in the gcode, these values are in actual millimeters, if there are thousands of thousands of values that can be catastrophic to make the stepper motor turn for hours before it stops. Specific gcode rules and use of many online, you can learn on your own.
2. Gcode file is saved in the memory card, Arduino reads the file from the card, and the position coordinates are resolved into the action of the stepper motor, pulling the rope to drive the pen to draw. (WallDraw.ino program in the package can perform this step)
Note:
-1. The memory card preferably fat32 format, ntfs format may not be able to read the file, especially the 32G capacity of the card or more.
-2. The file name of the Gcode file should be the same as the one defined in the program, usually "1.nc", if it is different, please change it to the same name.
3. Then you need to brush the WallDrawGCode program in Arduino. Connect your computer and Arduino with a USB cable and open CNCjs on your computer.
-1. First, use XLoad to swipe the compiled BIN file into the Arduino
-2. Open the WallDrawGCode.ino.standard.hex file we provided to you in XLoad, select Uno for Device, COM for your port, and 115200 for Baud rate (please install the Ch340 driver for unrecognized devices)
-3. Finally, click the Upload button, the status bar will show Uploading... prompt, close it after success.
4.After uploading the program to Arduino, install the CNCjs application on the computer side, select Grbl, the port number will be displayed automatically after searching, select 115200 for baud rate, open it and establish the connection.
5.After a normal connection, the console will show the following content. And there is an OK prompt.
You can test it by typing a simple GCode after the prompt.
G01 x0y0z0 // Drop pen
G01 Z1 //Lift pen
If the test is OK, you can open the GCode file and start your drawing!
Step 7: Conclusion
In the process of making we also encountered many problems:
1. The first important point is that the fixed pen should only reveal a little bit of the pen frame on it, do not stick out half of the pen, which will lead to not lifting.
2.If your tiller swing arm has been moving in the upward position, can not lift the pen holder. The simple solution is to take off the servo arm and replace it with one that can lift the pen holder and then install it on the servo spindle. Or adjust the parameters of the servo in the program to let the servo change the rotation angle. Do not rotate the servo with electricity, it may damage the servo.
3.In addition, the drawn image is seriously distorted. The solution is to first confirm whether the direction is normal. If you are testing with Walldrawdemo's program, the nine-pattern is at the top, the peach heart is at the bottom left, and the butterfly curve is at the bottom right. If the direction is wrong, first refer to the previous question and modify the direction. In most cases, the deformation is due to the wrong direction, so the size is wrong. If the direction is correct, the size of the x-axis measurement does not appear too much error, there is no serious deformation.
4.Be careful that if the motor spool is spinning wildly drawing is not normal.
5.Another situation is that, If you are drawing with GCode, it may be that the size in GCode is too large compared to the drawing board size, so the spool will keep spinning, even if the pen holder has hit the motor holder, or the spool is still spinning after it is completely released. Check if there are very large values in the GCode, like G01 X7777 Y6666 or some such code.
6.Last but not least, the drawing board is small, for example, the pitch is only 150mm, but the gcode exceeds the size of the drawing board (for example, an A3 size file is used), the calculated value will overflow and the motor will keep selecting the rotation.
Thank you very much for reading my work and hope you enjoyed my article this time! And if you have any questions, just leave a comment or send me a message.


