


Story
Since its launch in August 2024, Raspberry's RP2350 microcontroller has been adopted by various designers and manufacturers to develop their own boards. From the Raspberry Pico Version 2 to variants with specific enhancements, such as increased memory or additional peripherals, this chip has driven a new generation of devices.
Among these options, the Elecrow Pico W5 stands out, not only for incorporating 8 MB of Flash memory but also for its WiFi connectivity on both 2.4 GHz and 5.8 GHz bands.
It also includes Bluetooth 5.0, making it a great choice for Internet of Things (IoT) projects and many other applications.
In this article, I will introduce you to the main features of the Pico W5 and, most importantly, how to make the most of its connectivity capabilities. In the first part, we will explore its use with Arduino, while in an upcoming article, we will see how to do the same with MicroPython.
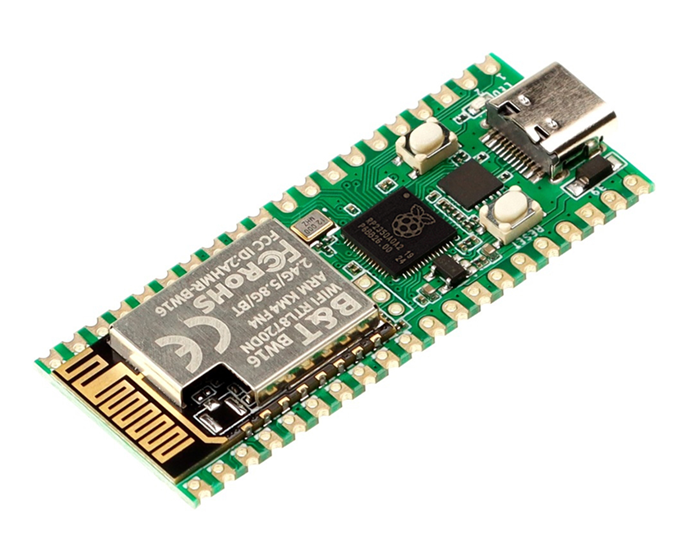
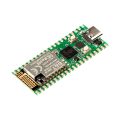
Fig. 1. The Elecrow RP2350 Pico W5
Features
Let's take a quick look at the main features of this board:
CPU
The Pico W5 is powered by Raspberry's new RP2350, which uniquely includes two distinct CPU blocks—one ARM-based and the other RISC-V, both featuring dual cores. Additionally, it is faster and more powerful than its predecessor, the RP2040.
- RP2350 up to 150 MHz
- Dual-core architecture, selectable between Arm Cortex-M33 or Hazard3 RISC-V
Memory
The Pico W5 stands out for its generous Flash memory capacity:
- 8MB Flash
- 520 KB RAM (integrated into the RP2350)
GPIO
The board maintains the same size and form factor as the Raspberry Pico 2, ensuring compatibility with modules and expansions designed for it.
- 24 multifunction GPIO pins (two fewer than the Pico 2, as they are used for the WiFi module)
- Compatible with Raspberry Pico 2
- RESET button
- BOOT button
- User-controllable onboard LED
- Castellated pins for soldering the board as a module
- USB-C connector for power and programming
The following image shows the pinout of the board:
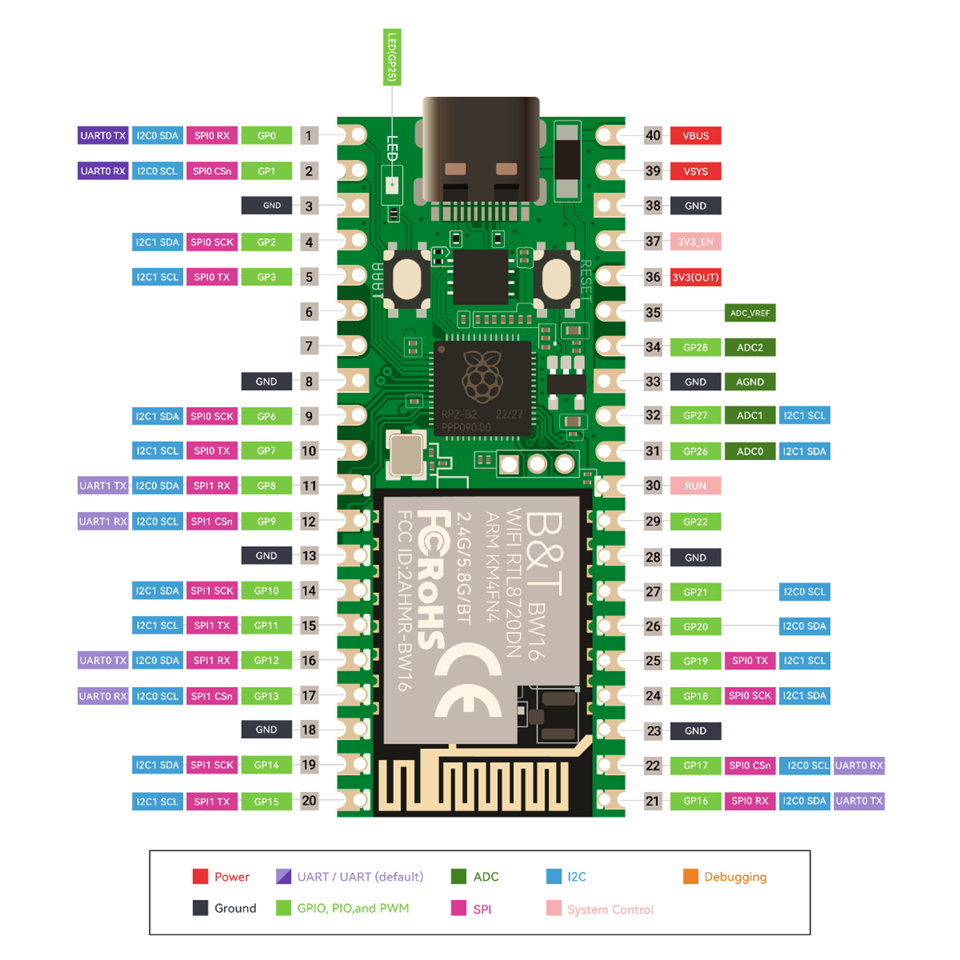 Fig. 2. Pico W5 pinout
Connectivity
The Pico W5's connectivity is powered by a BW16 module from B&T, which integrates the Realtek RTL7820 chip.
- Supports WiFi 802.11a/b/g/n on 2.4 GHz and 5.8 GHz bands
- Bluetooth LE with Bluetooth 5.0
The BW16 module is connected to the RP2350 via a UART interface, using GPIO4 and GPIO5. It includes AiThinker firmware, which implements common functions such as WiFi network access, HTTP requests, MQTT protocol support, and Bluetooth communication. These functions are controlled using AT commands.
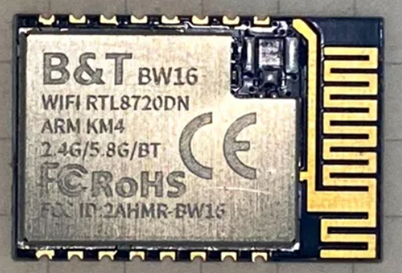 Fig. 3. The BW16 module
Programming
The Pico W5 can be programmed using various languages, with the most popular being MicroPython and C/C++, and it is also compatible with Arduino.
Below, we'll walk through how to program it using Arduino, and in an upcoming article, we'll explore how to do the same with MicroPython.
Setting Up Arduino IDE 2
To program the Pico W5 with Arduino, you first need to install Arduino IDE 2, the latest and improved version of the Arduino development environment.
You can download the installer from the official Arduino website. Choose the version compatible with your operating system (Windows, macOS, or Linux) and follow the installation steps. The process is straightforward and similar to installing any other program.
Once the Arduino IDE is installed, you need to add board support using the Board Manager.
This is a simple procedure, and if you've already used another board like an ESP32 with the IDE, you're likely familiar with it.
First, open the IDE preferences by selecting File > Preferences from the menu (or pressing Control + Comma):
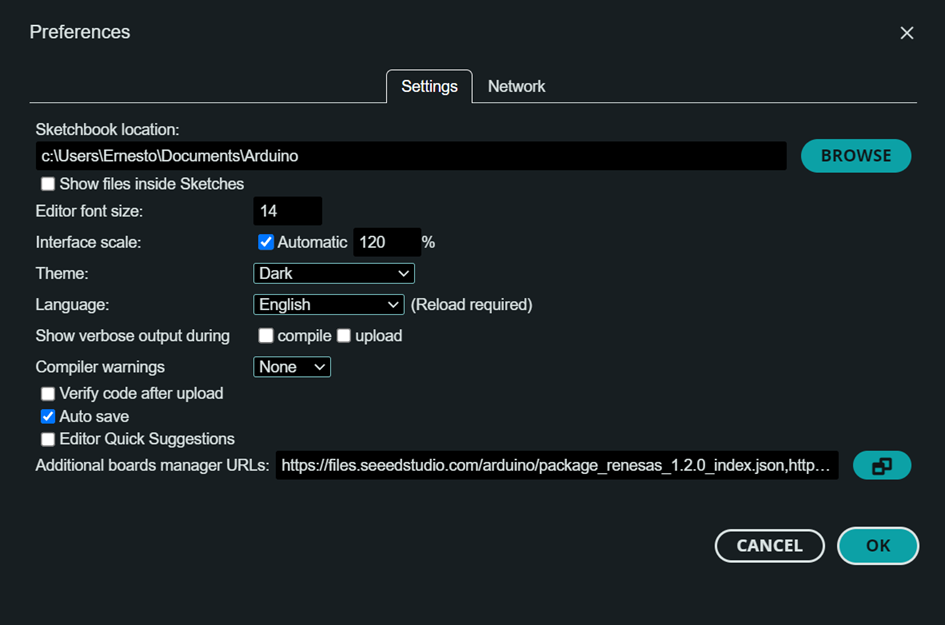
Fig. 4. IDE preferences
Look for the section labeled "Additional Board Manager URLs" and add the following URL:
https://github.com/earlephilhower/arduino-pico/releases/download/global/package_rp2040_index.jsonIf you already have a URL for another board, do not delete it—simply add the new one below.
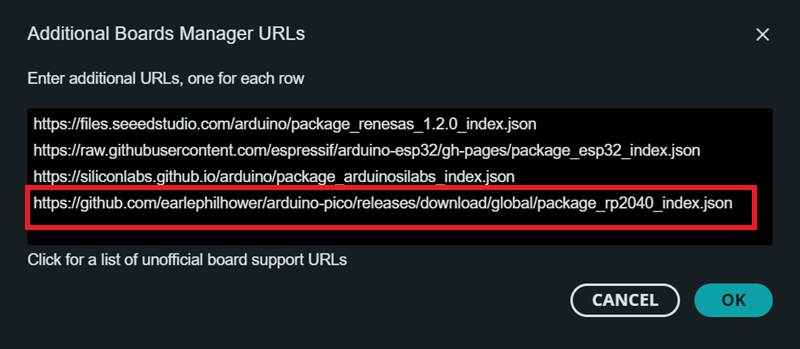
Fig. 5. Additional boards manager URLs
Click the "OK" button, then go to the Board Manager in the left toolbar of the Arduino IDE.
In the search box, type RP2350. You will see the installer for various boards based on the RP2040 and RP2350. Click "INSTALL" to proceed.
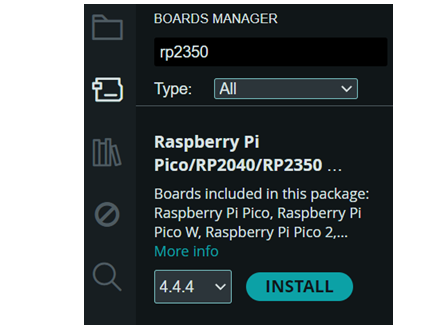
Fig. 6. Boards manager
After a few minutes, all the necessary packages will be downloaded and installed.
Next, connect the board to your computer using a USB cable. Make sure it is recognized as a new device—keep in mind that some USB cables only provide power and do not support data transmission.
Select the board from the menu:
Tools → Board → Raspberry Pi Pico RP2040/RP2350 → Generic RP2350

Fig. 7. Board selection
Next, specify the port where the board is connected by selecting:
Tools → Port
In Windows, look for a COM port. The first time, you might see something different, like "UF2 Board", but after uploading the first code, it will appear as a COM port.
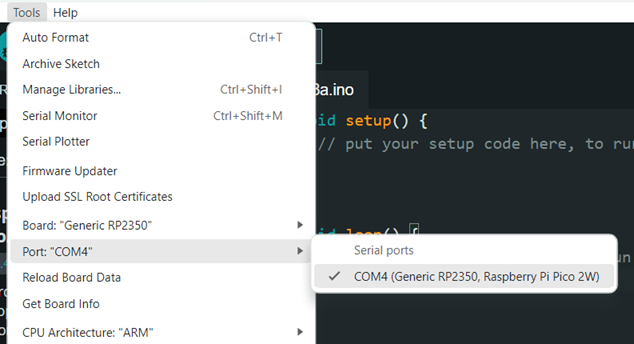
Fig. 8. Port selection
Finally, set the Flash memory size to 8 MB.
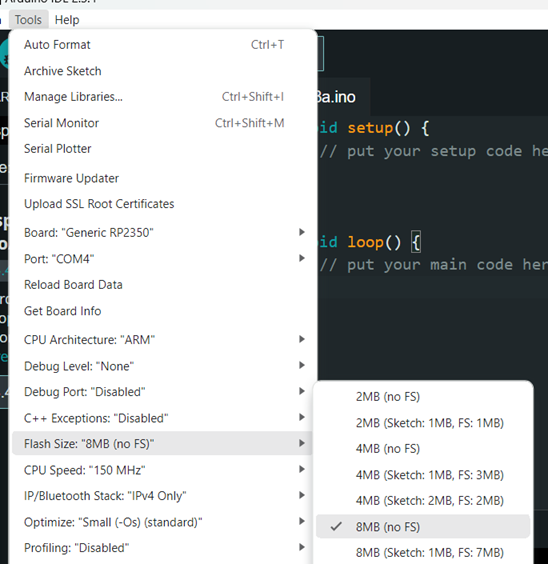
Fig. 9. Flash size selection
Once you have completed these steps, your Arduino IDE is fully configured to program the Pico W5. You can test it by running the "Blink" program, which you can find under:
File → Examples
Examples
Now, let's explore some programming examples. Since the GPIO control and other basic functions are the same as in the Pico 2, we will focus on connectivity, which is the key distinguishing feature of this board.
AT Commands
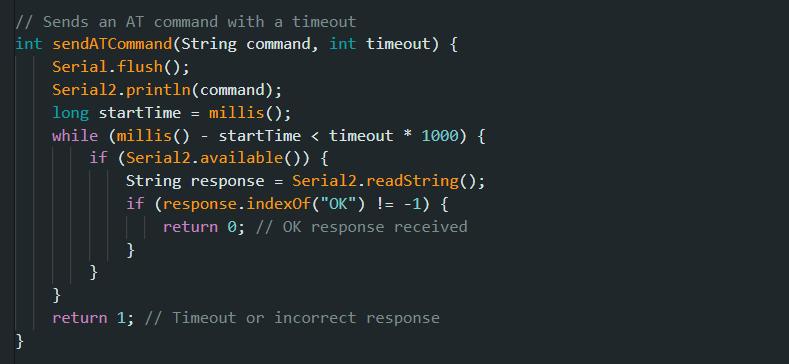
The first example is a simple "terminal" that mirrors what you type in the serial monitor to the BW16 module, and vice versa. This allows you to experiment with different AT commands.
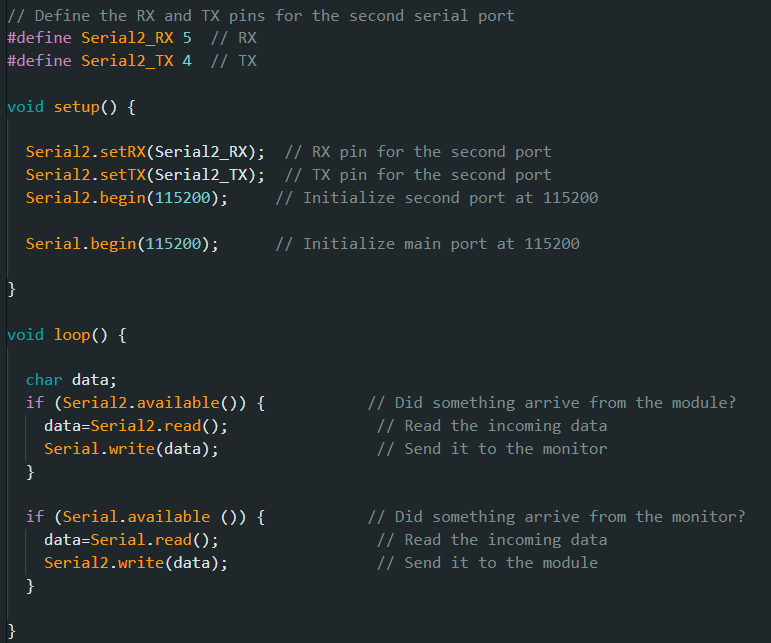
All available AT commands are documented here.
Here is the response to some test commands.
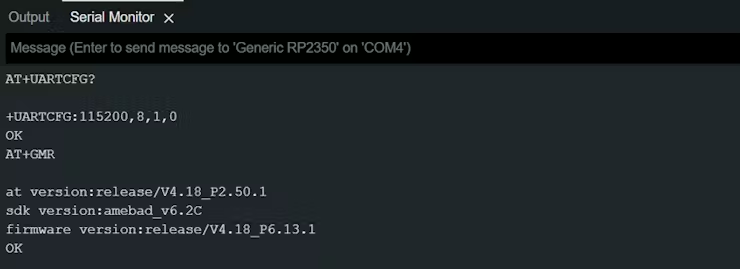 Fig. 10. AT commands test
WiFi Connection
To manage the connection to a WiFi network, the firmware provides several commands, including:
- AT+WMODE: Sets or queries the operating mode
- AT+WJAP: Connects to a network
- AT+WSCAN: Scans available networks
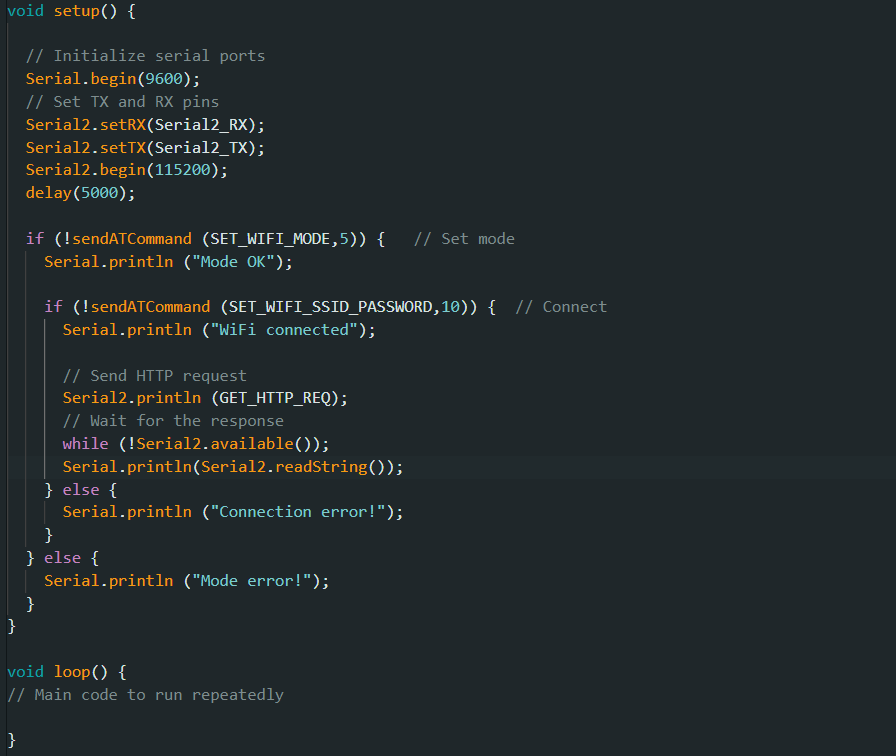
This example connects the board to a WiFi network in STA mode:
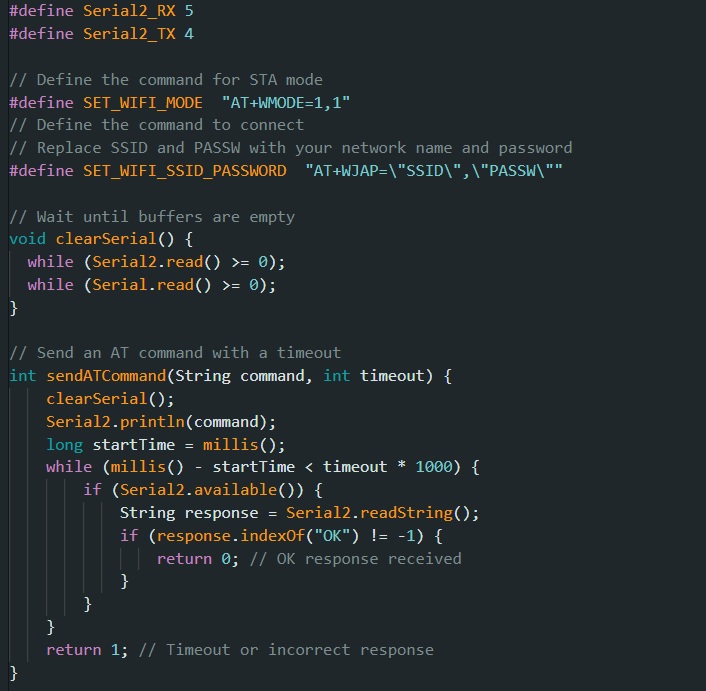
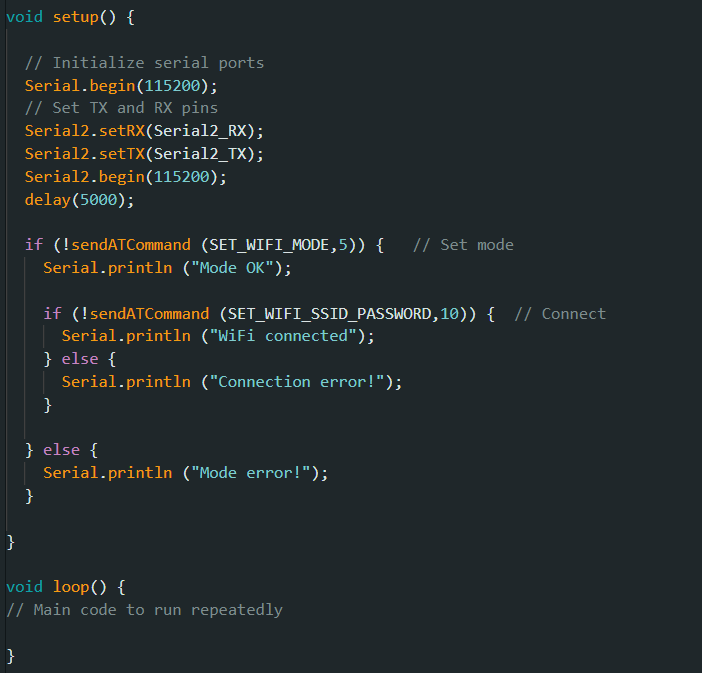
The procedure and commands used are identical, whether connecting to a 2.4 GHz or 5.8 GHz network.
HTTP Request
This example demonstrates how to make a GET request to an API using HTTP.
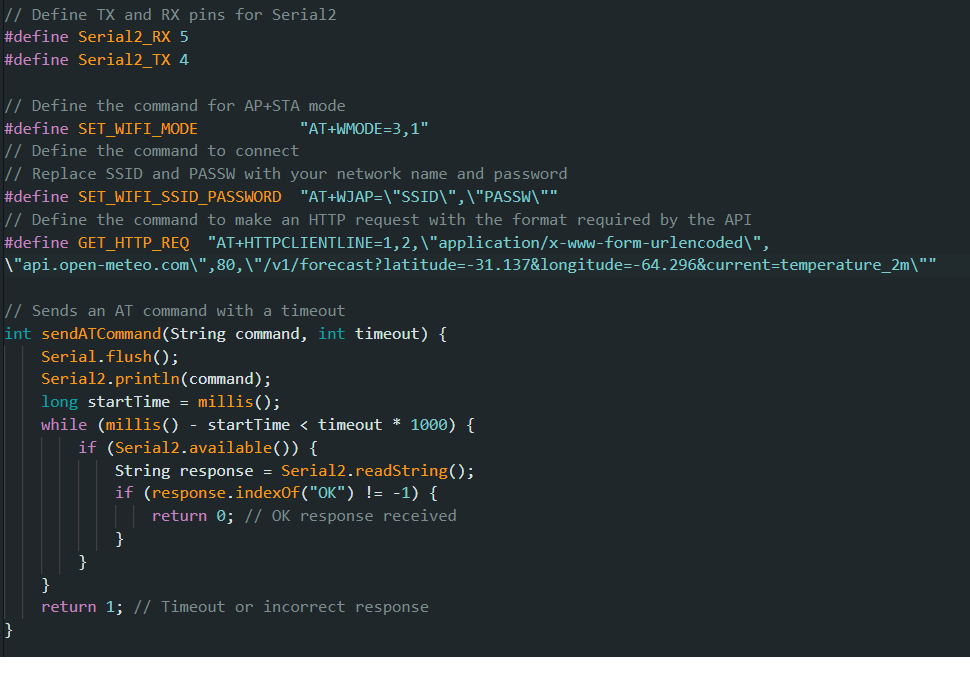
The command used for the request is AT+HTTPCLIENTLINE, and the format is as follows:
AT+HTTPCLIENTLINE=<transport_type>,<opt>,<content-type>,<host>,<port>,<path>[,<data>]
You can find the full documentation for the command here.
For this example, I made a GET request to the open-meteo.com API, passing the latitude and longitude of my location as parameters, along with the requested data (current=temperature_2m), which represents the current temperature at a height of 2 meters above the ground.
AT+HTTPCLIENTLINE=1,2,"application/x-www-form-urlencoded","api.open-meteo.com",80,"/v1/forecast?latitude=-31.137&longitude=-64.296¤t=temperature_2m"
The response, which is in JSON format, is as follows:
{"latitude":-31.125,"longitude":-64.25,"generationtime_ms":0.014901161193847656,"utc_offset_seconds":0,"timezone":"GMT","timezone_abbreviation":"GMT","elevation":740.0,"current_units":{"time":"iso8601","interval":"seconds","temperature_2m":"°C"},"current":{"time":"2025-02-16T15:00","interval":900,"temperature_2m":26.5}}
Among all the returned information, you can see the requested temperature value (26.5 degrees) at the end.
MQTT
In this example, I will show you how to connect to an MQTT server and publish data to a topic.


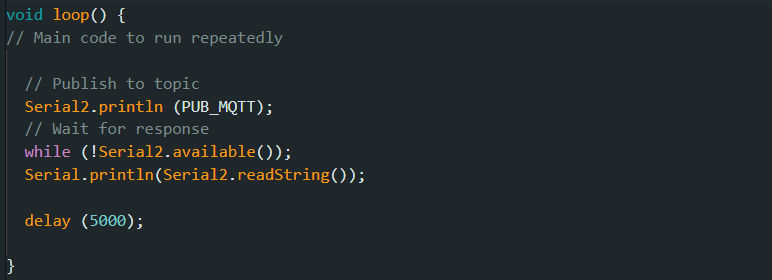
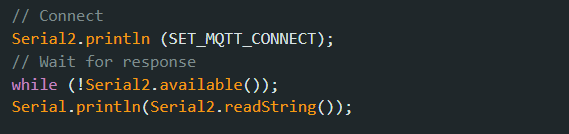
After connecting to the WiFi network, the MQTT broker connection is configured by sending multiple AT+MQTT commands with different parameters: the broker address, connection port, connection method, and client ID

Then, the connection is established using the specified parameters with the AT+MQTT command.
And then, a simple text "Hello" is published to the PicoW5 topic every 5 seconds.

The data received on the broker can be viewed using a client like MQTTX:
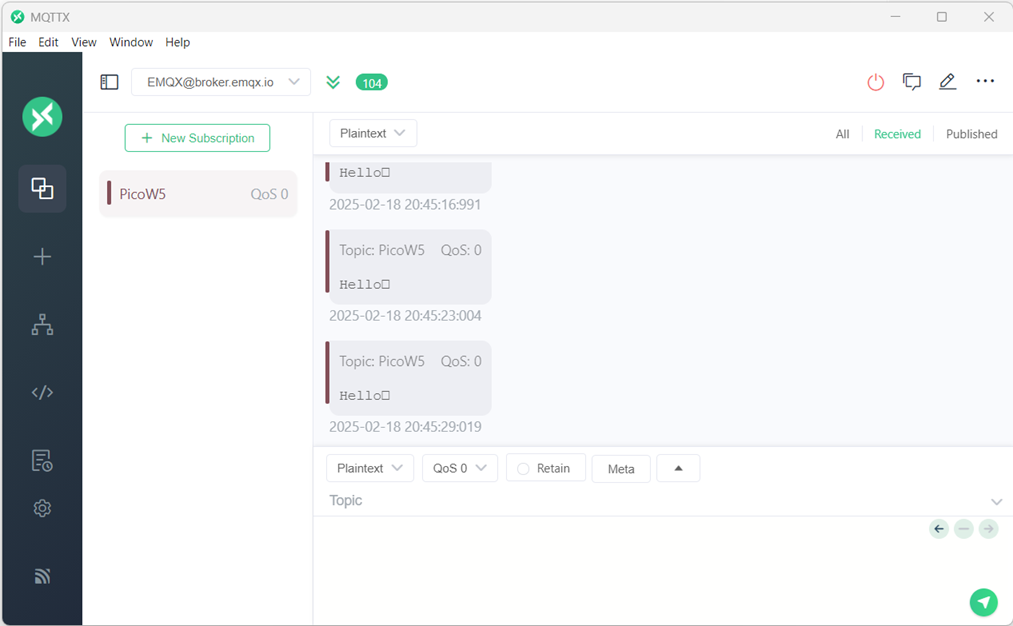
If MQTT connection errors are observed, the board should be restarted to terminate any previously open connections and then try again.
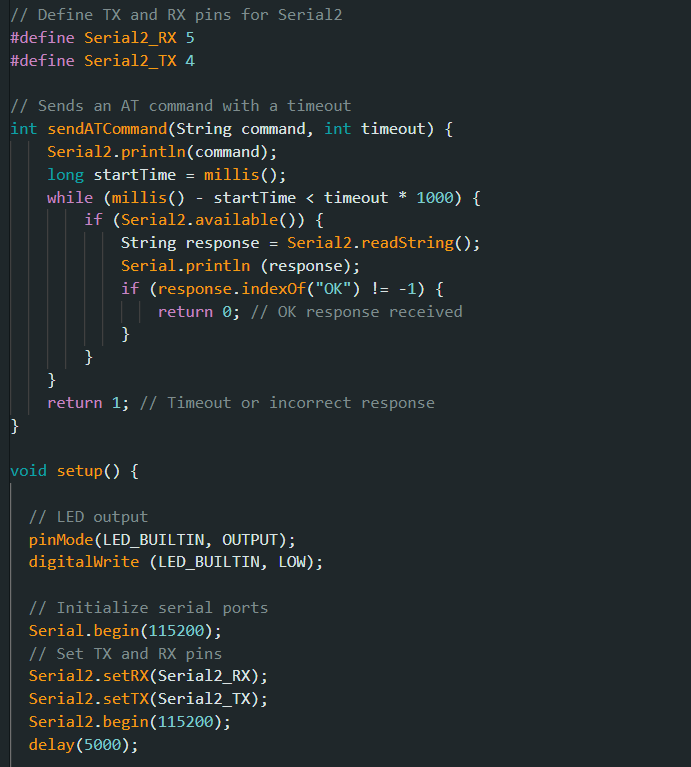
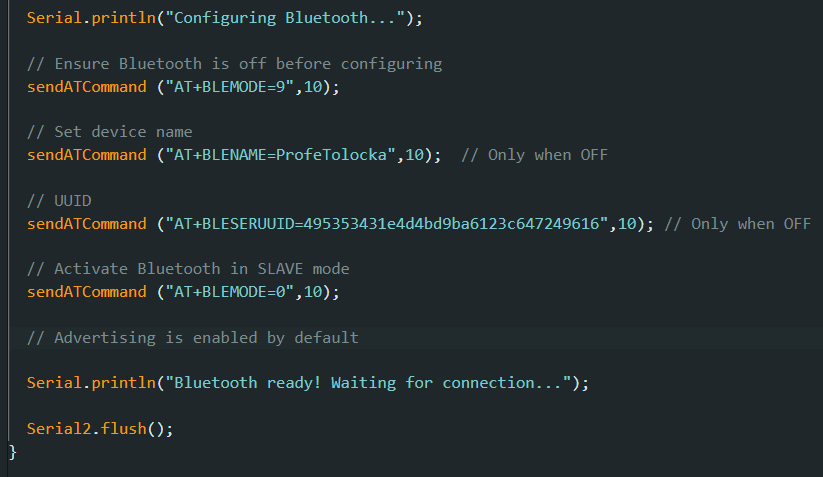
Bluetooth LE
Finally, here is an example using the Bluetooth Low Energy (BLE) interface of the Pico W5.
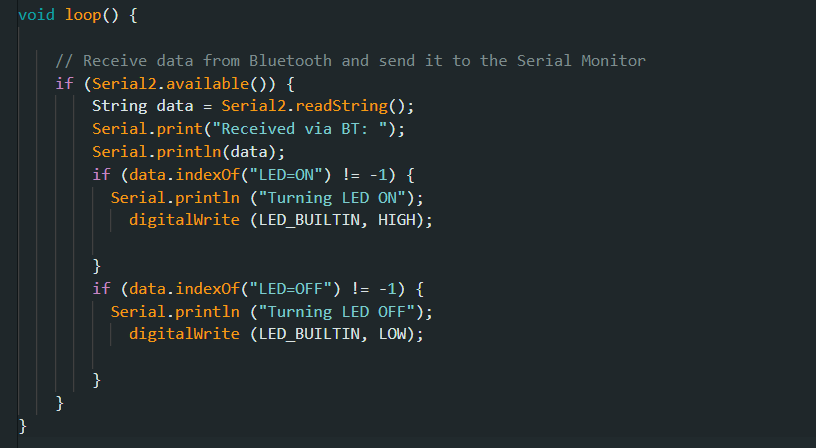
This is a simple program that configures the BW16 module in Slave mode to receive text data via Bluetooth. If the received text is "LED=ON", the onboard LED on the Pico turns on, and if it receives "LED=OFF", the LED turns off.
To test the functionality, I used a simple app called Arduino Bluetooth Controller for Android, which you can download from the App Store. There are many similar apps available, so you can use any other that serves the same purpose.
In the app, I used the Switch function, which allows defining the text sent in both positions of the on-screen switch. The values must be set according to what the code expects: "LED=ON" for the on position and "LED=OFF" for the off position.
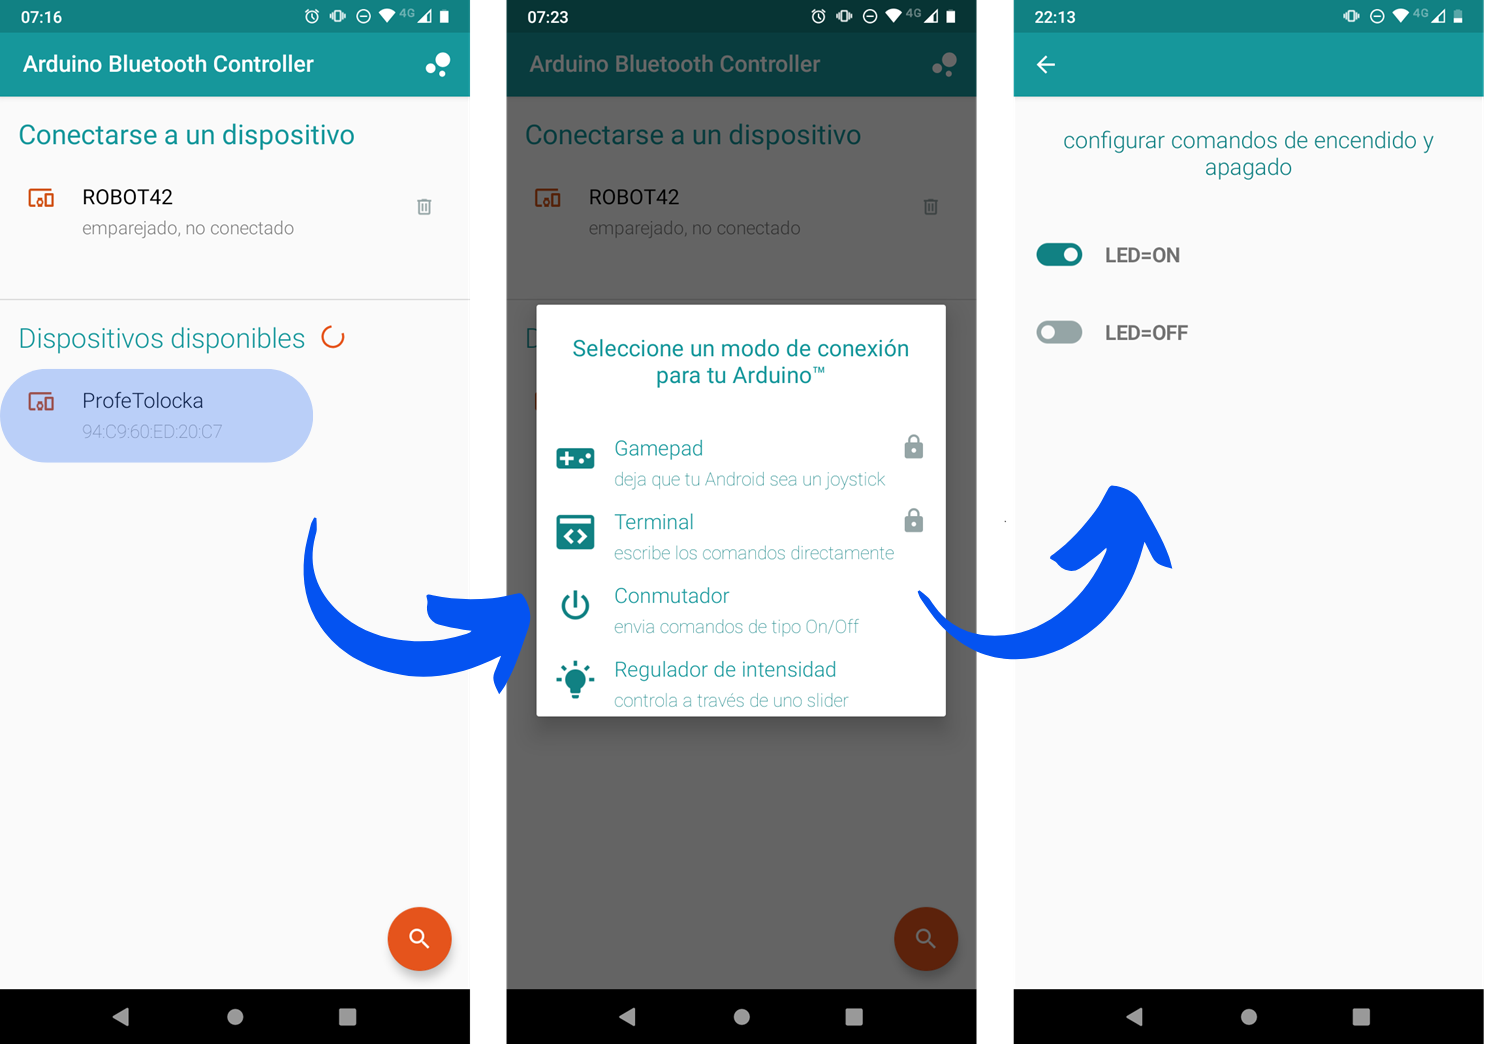
Fig. 12. App configuration
Repositories
All the example programs published in this article, along with others I continue to add for the Pico W5, can be found in this repository
Conclusions
In this article, I introduced you to the main features and some applications of the RP2350 Pico W5 from Elecrow. We explored its technical specifications, highlighting its Flash memory capacity, USB-C connector, and ability to work with 5.8 GHz WiFi networks. We also analyzed the available programming options and walked through a step-by-step guide on how to set up Arduino IDE to start working with it.
Finally, I presented several example programs demonstrating how to use the AT commands of the built-in BW16 module to perform basic connectivity functions, such as WiFi connection, HTTP requests, MQTT communication, and BLE usage.
In conclusion, the Pico W5 is a powerful and versatile board, ideal for IoT applications and home automation. Its compatibility with the Raspberry Pico 2 hardware makes it an excellent option for developers of all levels, allowing them to fully leverage its potential in projects requiring multiple connectivity options. Moreover, its ability to operate on 5.8 GHz networks sets it apart from many other boards on the market, providing a faster and more stable connection, especially in environments where the 2.4 GHz band is congested due to a high number of connected devices.
I hope this article has been useful and helps you start creating your own projects with the Pico W5. If you have questions, suggestions, or would like to share your experiences, feel free to do so in the comments section below.
For more information and projects, you can check out my blog and social media.
See you next time! 🚀
More Info
- Elecrow Wiki
- Pico W5 Schematics
- AiThinker Combo Firmware