


Story
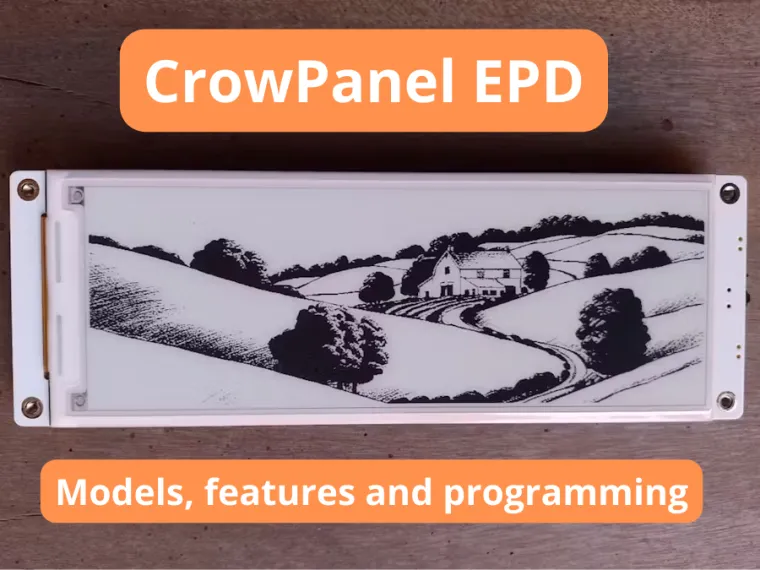
Electronic Paper Displays (EPD) or ePaper have become a top choice for various applications thanks to their outstanding features, such as excellent readability in bright environments (even under direct sunlight) and low power consumption.
These advantages make them ideal for applications like:
.
- Electronic labels
- Outdoor signage
- Information panels in automation systems
- E-book readers
.
However, developing a project with ePaper displays can be a bit challenging. It’s not just about selecting the right size and resolution; you also need a compatible controller or adapter board to connect and manage the display from your CPU, mainboard, or microcontroller.
.
Fortunately, Elecrow offers a comprehensive solution to simplify the process: the CrowPanel series. These all-in-one units combine the display, its controller, and a powerful ESP32-S3 CPU in a single device. Additionally, the panels feature two buttons and a rotary switch for user interaction, a battery connector, a UART port, a GPIO connector to integrate the ESP32-S3 pins with external circuits, and an SD card slot perfect for storing graphic data.
.
Thanks to this combination of features and functionalities, CrowPanels are an excellent solution for developing your own ePaper display applications with ease.
.
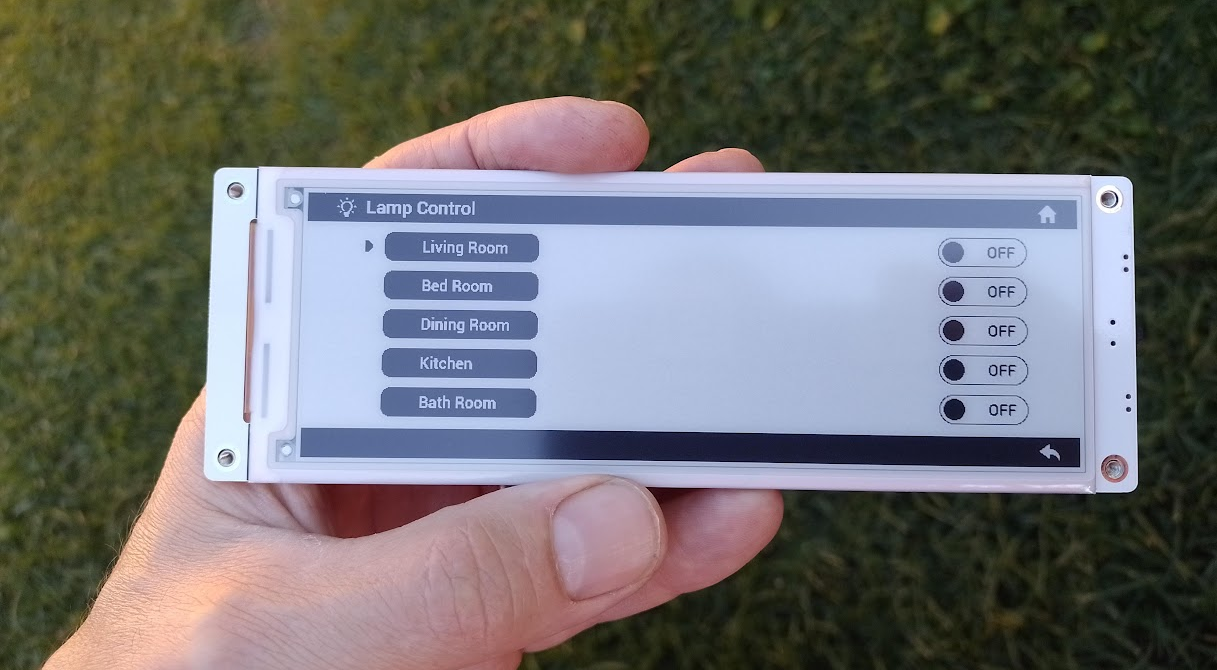
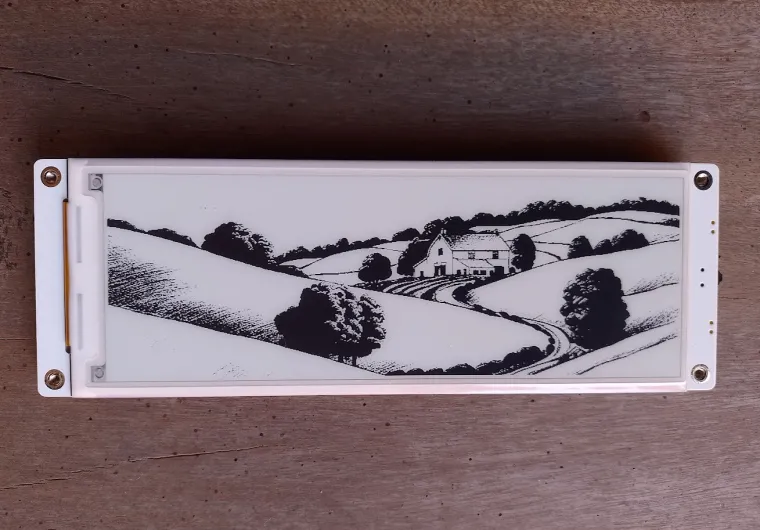
Fig.1. A 5.79" panel
.
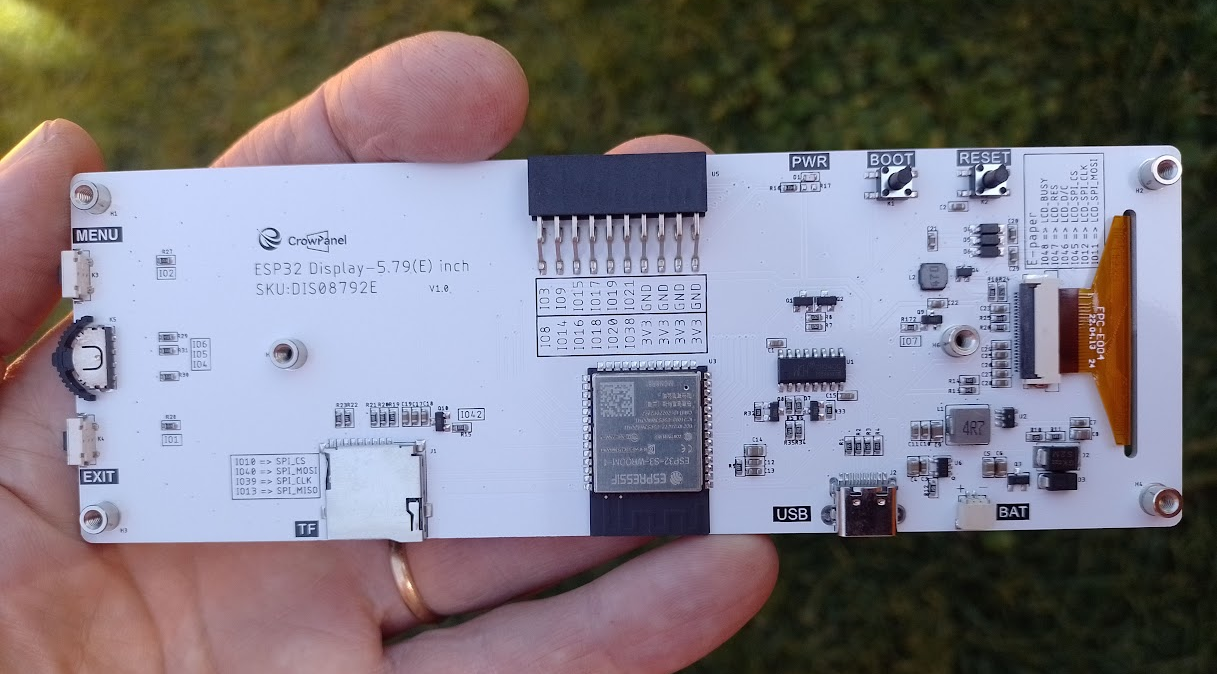
Fig. 2. Rear view of 5.79" panel
.
Models
.
Currently, Elecrow offers 6 different models of these panels, allowing you to choose the one that best suits your needs. All models feature two colors (black and white) and come in various sizes and resolutions:
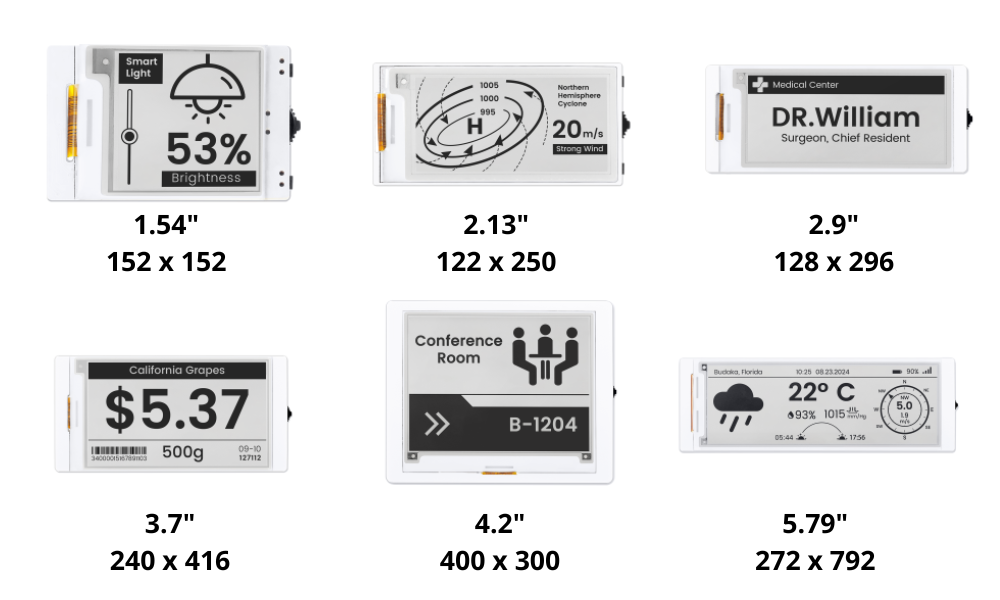
Fig. 3. CrowPanel models
.
Features
.
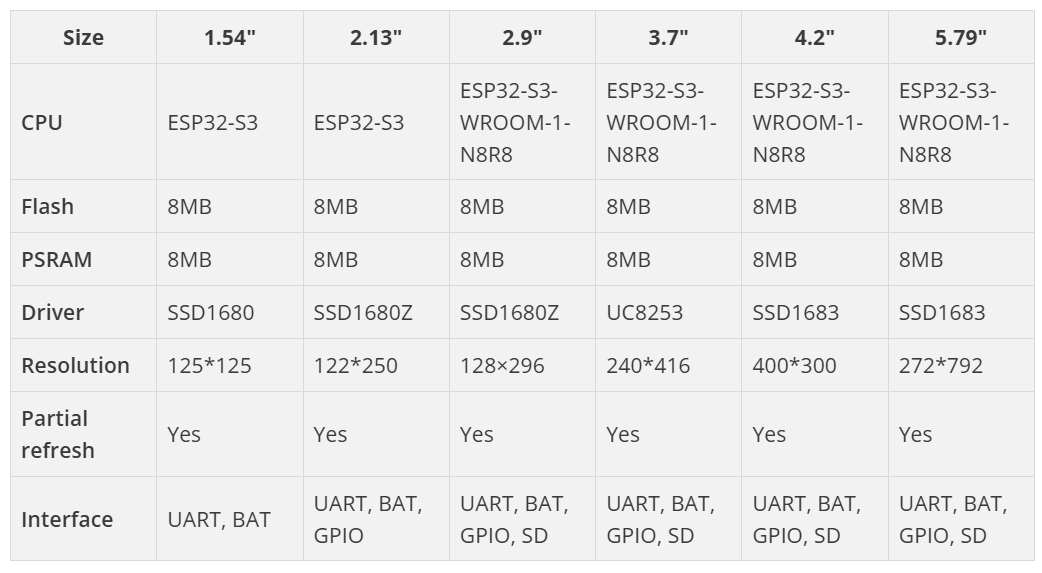
All CrowPanels share similar features, with minor variations. Each includes an ESP32-S3 CPU, two buttons, a rotary switch, a battery connector, 8 MB of Flash and RAM, and a USB-C port for power and programming.
Depending on the specific model, certain specifications may vary, as shown in the following table:
.
.
Programming
.
Thanks to the integrated ESP32-S3, CrowPanel displays can be programmed using any language or environment compatible with this microcontroller. This provides great flexibility in choosing the platform that best suits your needs.
.
Popular options include Arduino, ESP-IDF, MicroPython, CircuitPython, and even Rust if you decide to develop your own drivers to control the displays. However, if you prefer to avoid this effort and use ready-to-use libraries that save time and effort, the options narrow down.
.
Elecrow has developed specific libraries for Arduino that allow you to easily control all the features of their panels. While the panels use different controller chips, these libraries abstract the technical details and provide a uniform set of functions for all models. This greatly simplifies the process, eliminating the need to create custom drivers and offering a quick and efficient solution.
.
If you’re looking for a more generalized alternative, you can also opt for GxEPD2, a widely used library that helps standardize code, especially when working with displays from different manufacturers in various projects. However, one disadvantage of GxEPD2 is that it might not be as optimized for a specific display model as Elecrow's libraries. It’s worth mentioning that GxEPD2 is also designed to work within the Arduino environment.
.
In other programming languages, the situation is more complex. While some drivers are available, their compatibility depends on the display controller and they are not typically designed specifically for these panels, which could complicate the implementation if you don’t have prior experience with such developments.
.
For these reasons, Arduino stands out as the simplest and most versatile option for working with CrowPanel displays. Below, I’ll use this environment to show you a practical application example.
.
Application Example
.
In this simple example, we will learn how to load an image onto a panel. This process, known as a full refresh, updates all the pixels on the screen. Besides understanding this basic concept, we will explore the libraries provided by Elecrow and how to use some of their main functions.
.
This example will also allow us to analyze the procedure for preparing and converting images—an essential and recurring step when working with this type of display—so they can be properly displayed on the panel.
.
If this is your first time programming an ESP32 with Arduino, I will also guide you through the steps to set up the IDE and get it ready for writing your code.
.
Image Design
For this example, I’ll be using the largest panel, the 5.79-inch CrowPanel. Therefore, the image to display must have dimensions of 272 pixels in height and 792 pixels in width (always ensure the dimensions are multiples of 8). Additionally, the image must be monochrome (1 bit per pixel).
.
You can create or design the image using any design software, even Paint, which comes pre-installed on Windows. The image I’ll use is as follows:
.

Fig. 4. Image used for the example
.
Preparing the Image
Before displaying an image on the ePaper, it must be converted into a compatible format that can be integrated into the code.
.
This can be done using the image2lcd software, which converts the image into a header file (a “.h” file) containing the image data in the form of a byte array (unsigned char).
.
Installing image2lcd
The image2lcd program can be downloaded from this link.
.
When you click the link, a compressed file in “7z” format will be downloaded. You need to extract it, run the executable file, and follow the installation steps. This program is Windows-exclusive and does not have versions for other operating systems.
.
Once installed, launch the program, and you will see a screen similar to the one shown below:
.
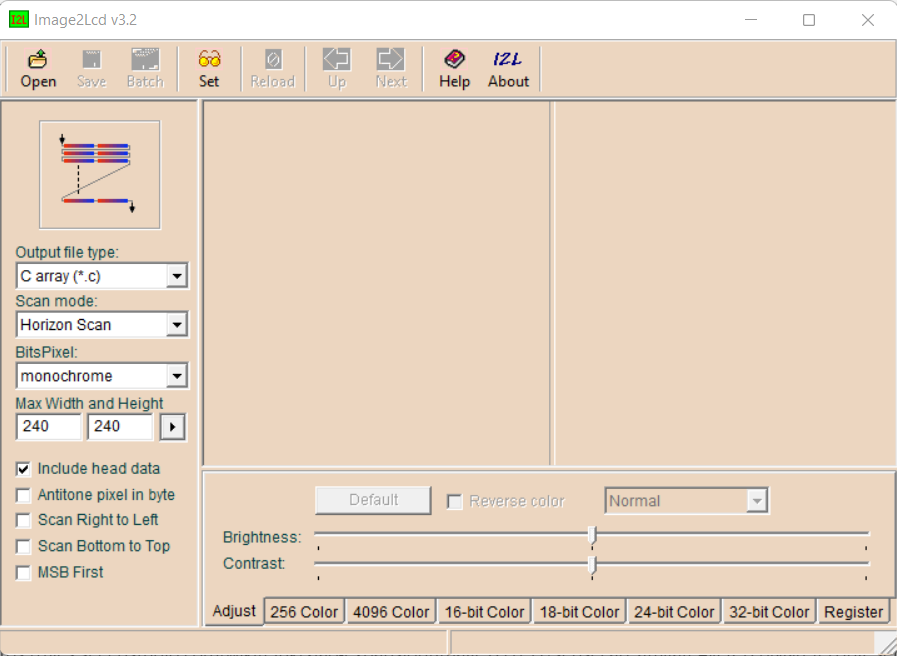
Fig. 5. The Image2Lcd program
.
In the bottom-right corner, you’ll find a tab labeled “Register.” It’s important to register the program; otherwise, it will add a watermark to the images you convert. Click on the “Register” tab and enter the following code: 0000-0000-0000-0000-6A3B
.
Converting the Image
Once the program is installed and registered, you can proceed to convert the image format.
Click on the Open icon and load the image you want to transform.
Adjust the settings on the left-hand side to match the following configuration:
.
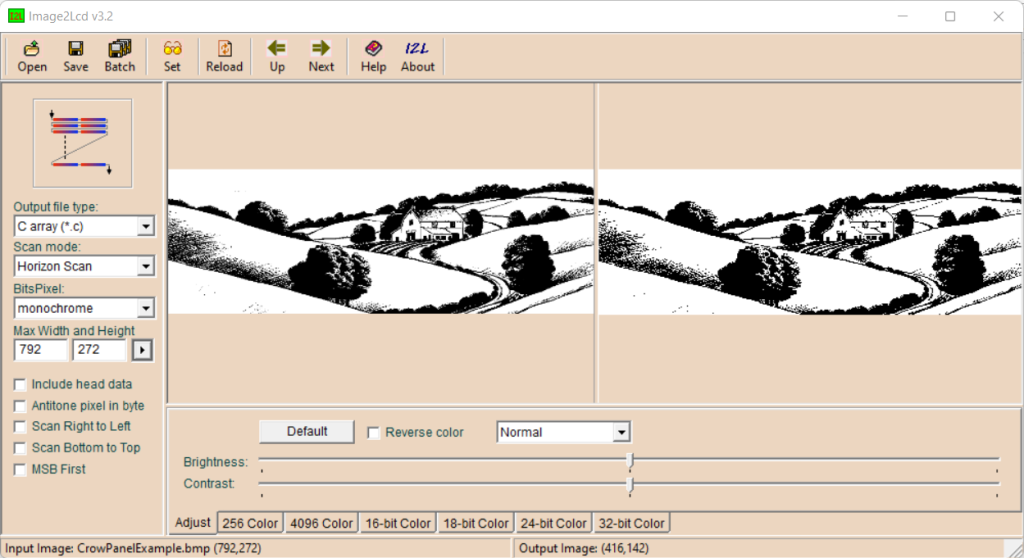 Fig. 6. Image conversion
.
Once the settings are adjusted, don’t forget to click the arrow-shaped button next to the "272". This will complete the image conversion process.
.
Next, click the Save icon (to the right of Open) and save the data with any name you prefer (e.g., CrowPanelExample.h). The resulting file will look like this:
.
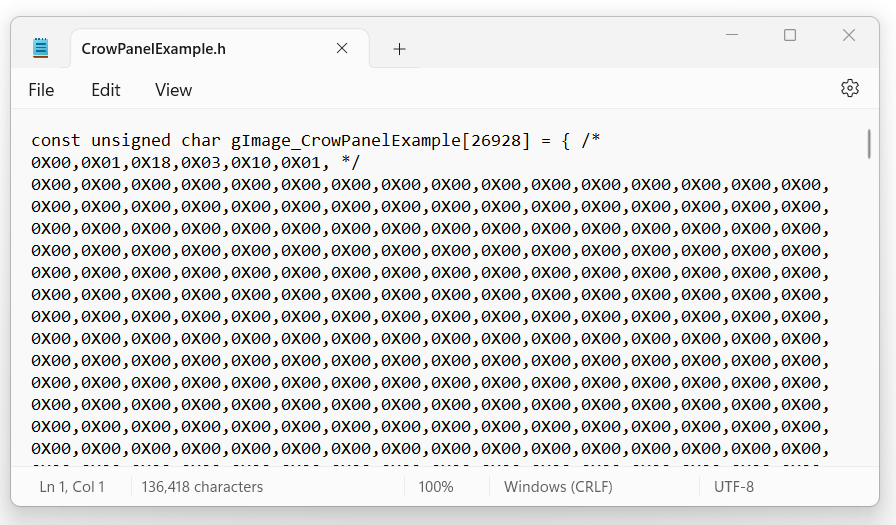
Fig. 7. Header file with image data
.
Configuring the Arduino IDE
Now, let’s review some configurations in the Arduino IDE to prepare it for the code in our example.
.
The version of the IDE used for this example is 2.3.4
.
If you’re already using the ESP32, you can skip this step and go directly to the board configuration. If not, you’ll need to set up the IDE for ESP32 first.
.
To do this:
Go to the File menu and select Preferences (or press CTRL +,).
A window will appear. Click where it’s marked in the image below.
.
 Fig. 8. Preferences of Arduino IDE
.
In the next window, copy and paste the following line:
https://raw.githubusercontent.com/espressif/arduino-esp32/gh-pages/package_esp32_index.json
.
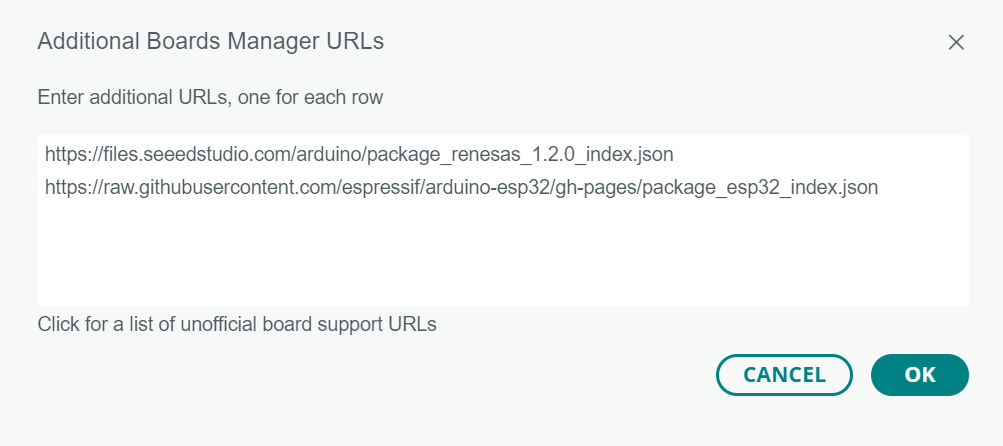
Fig. 9. Configuring the Boards manager
.
Click the OK button to close the preferences window. In the toolbar on the left side of the Arduino IDE, select the Board Manager option.
.
In the search box, type ESP32, and you’ll see the available packages for ESP32 boards. Locate the one labeled esp32 by Espressif Systems and click INSTALL.
.
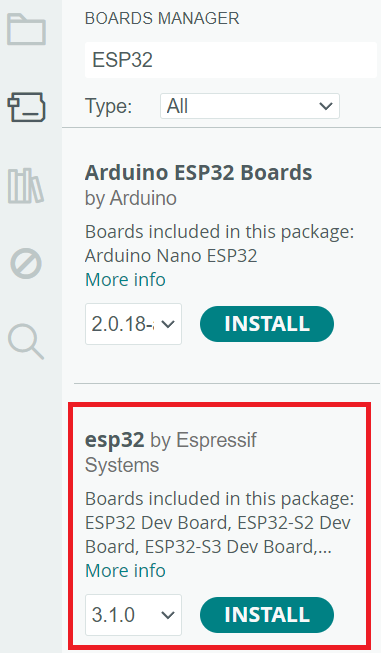
Fig. 10. Boards manager
.
After a few minutes of downloading and installation, the IDE will be ready to program the ESP32.
.
Board configuration
The final step is to adjust the panel settings within the IDE.
To do this, go to Tools – Board – esp32, and from the list displayed, select the ESP32S3 Dev Module model.
Now select the option Tools – Partition scheme and choose Huge App (3 MB No OTA / 1MB SPIFFS) from the list.
Next, go to Tools – PSRAM and select OPI PSRAM from the options.
Finally, select the COM port under Tools – Port.
.
That's it! Your Arduino IDE is now fully configured to work with the CrowPanel. 👍
.
Code
Now that the header file with the image information is ready and the IDE is properly configured, you can upload the code to the panel.
.
Libraries
We will use several libraries provided by Elecrow, each serving a specific purpose, from controlling communication with the ePaper display to drawing images or graphic elements on it.
.
Although the function names defined in these libraries are consistent across different panels, since the panels use different controllers, the libraries are specific to each panel.
.
This is extremely important: you cannot use the libraries from this example for the 5.79″ panel in a program designed for the 3.7″ panel. Each panel has its own specific libraries. At the end, I’ll explain how to locate the appropriate library for each one.
.
For the 5.79″ panel, the libraries are as follows:
.
EPD: The main library, which includes functions for displaying images, text, or geometric elements.
EPD_Init: Handles the initialization and configuration of the ePaper, effectively "communicating" with the hardware.
EPD_Font: Contains font or typeface definitions.
spi: Provides functions to communicate with the ePaper using the SPI bus.
.
Operation
Let’s now analyze how the example code works.
The first #include loads the EPD.h library. This library, in turn, calls the other libraries, so it’s the only one we need to include directly.
The second #include loads the image file we previously generated with the Img2Lcd program, allowing us to use it in the code.
.

.
Next, an array is defined to serve as a buffer for storing the image. The array is sized for an 800 x 272 pixel image, slightly larger than the actual image size due to internal adjustments made by the library.
.
![]()
.
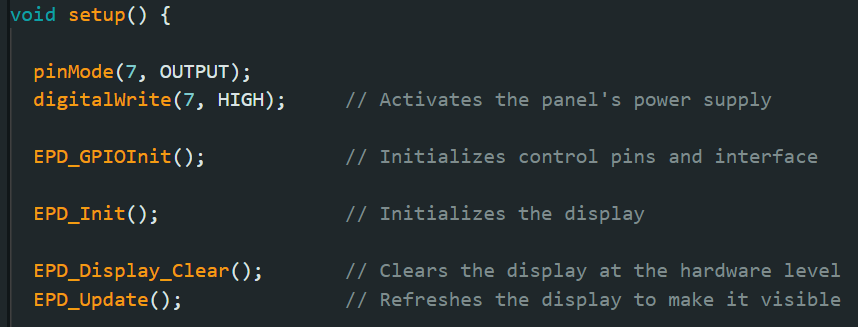
Once this is done, the Arduino setup function begins, where all the action actually takes place. The first step is to perform a series of initial hardware configurations necessary to bring the panel to a known state.
Pin 7 is connected to the circuit that controls the power supply to the ePaper, so the first task is to configure it as an output and set it to HIGH, turning on the display.
Next, EPD_GPIOInit configures other pins of the ePaper, including those for the SPI interface.
EPD_Init sets up the internal registers of the ePaper, and EPD_Display_Clear clears it by also accessing its internal registers.
Finally, EPD_Update refreshes the display. Whenever operations are performed that modify the content of the display, EPD_Update must be called to make the results of these operations visible.
.
.
At this point, the display is properly configured and cleared. Next, the example image is loaded.
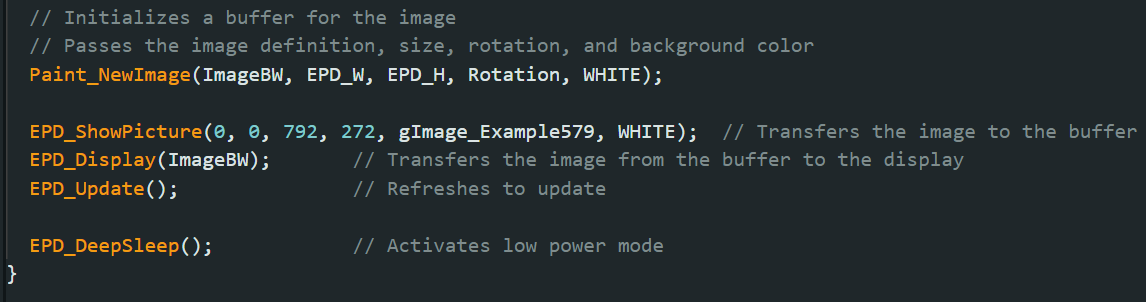
The first step is to call Paint_NewImage, which prepares the image buffer with the display's configuration (size) while specifying a rotation angle, background color, and the image to be loaded. By default, Rotation is set to 180 degrees so the image appears correctly with the buttons and rotary wheel on the right (if you want it flipped, pass a value of 0).
.
Then, the image data is transferred to the buffer using EPD_ShowPicture. Here, you must specify the coordinates where the image will begin to display, its size in pixels, the image name, and the background color. Since this image will cover the entire screen, it starts at 0,0, and its size matches the dimensions of the panel. The name gImage_Example579 comes from the definition in the header file Example579.h.
.
After this, the buffer content is transferred to the ePaper using EPD_Display, but it will only become visible on the panel after EPD_Update is executed.
Finally, the panel is put into low-power mode with EPD_DeepSleep.
.
.
This is how the panel looks with the example image loaded:
.
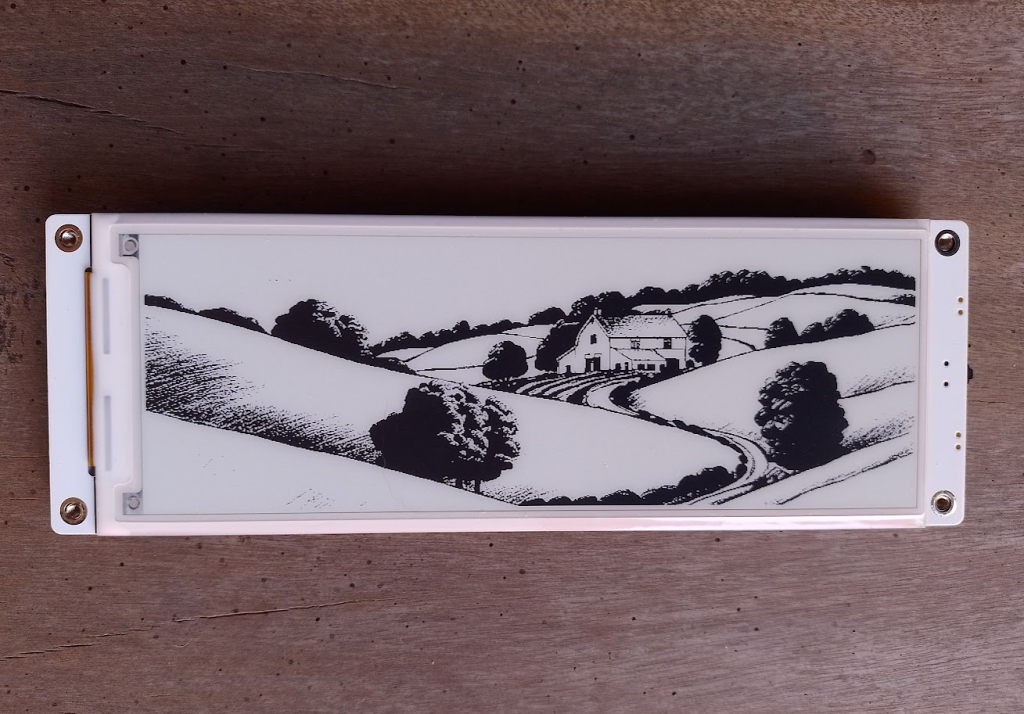
Fig. 11. The panel displaying the example image
.
This example is very simple, but it serves to explain the basic operation of the panel and how to use its libraries so you can later apply it to your own projects.
.
Repositories
The specific libraries for each panel, as well as the original examples, can be found in Elecrow's repository, which you can access here.
.
This example, along with the libraries used for the 5.79″ panel, is also available in my repository, which you can find at this address.
.
Lastly, here is the repository containing all the examples, tutorials, and tools I’ve been preparing in relation to these panels.
.
Conclusions
The CrowPanel EPD displays combine a set of features that make them ideal for quickly and easily developing various projects requiring an electronic paper display.
.
Their powerful ESP32-S3 CPU, with ample memory, user interface buttons, UART and GPIO connector, battery-powered capability, and SD card slot, make them a versatile and standalone solution for a wide range of applications.
.
Additionally, their integrated Wi-Fi and Bluetooth connectivity enable seamless IoT project development, while the SD card slot simplifies data or graphics storage. Combined with their low power consumption, CrowPanel EPD displays are perfect for portable projects, smart signage, informational panels, and much more.
.
In this article, I provided an introduction to these panels to give you an overview of their capabilities and how you can use them for specific applications. In future posts, we’ll explore more complex projects and delve deeper into their features.
.
See you next time!
.
More Info
.
For more information and projects, you can check out my blog and social media.