

Story
How can you display essential information at a glance on a low-power, connected screen?
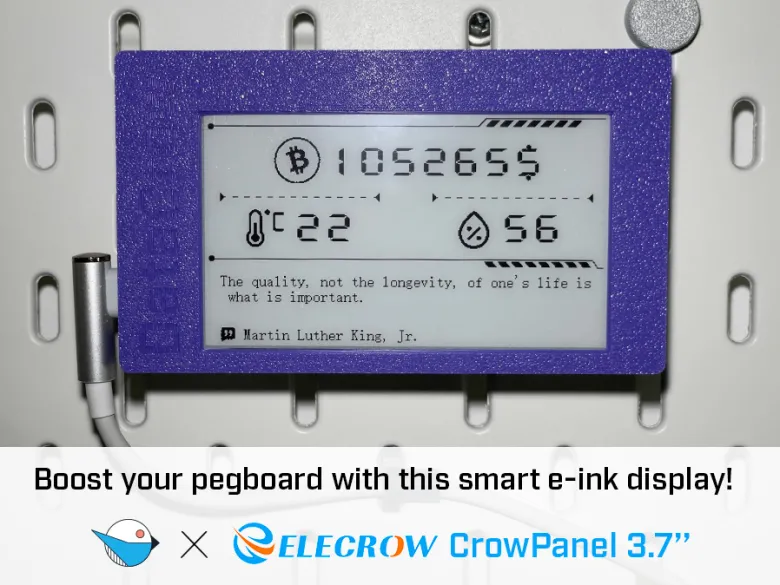
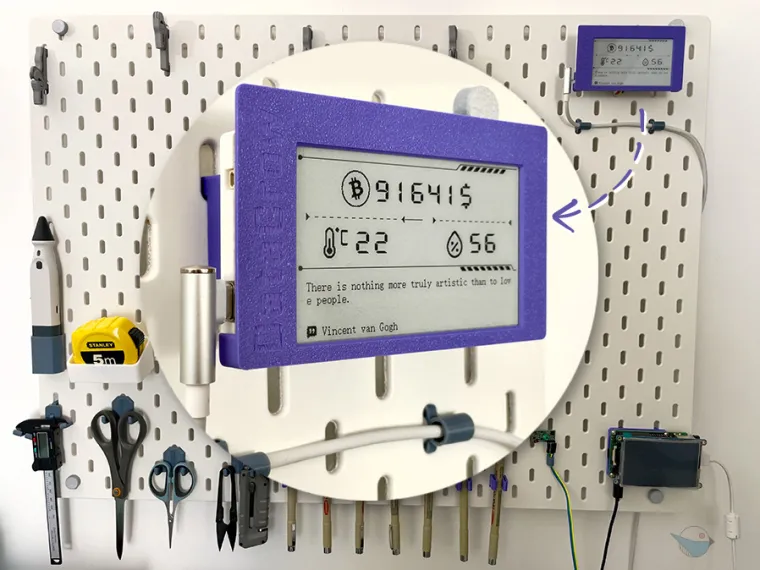
This project answers that question by leveraging the CrowPanel 3.7”, a black-and-white e-ink display equipped with an ESP32-S3. This all-in-one module is mounted on a compact PCB, with several buttons to facilitate prototyping.
For this first experiment, I designed a connected display that presents (almost) real-time dynamic data from various sources.
Displayed Data:
- Bitcoin price, retrieved via an API
- Inspirational quote and its author, also via an API
- Local temperature and humidity, measured with a DHT22 sensor, chosen for its simplicity and compatibility with the ESP32-S3
Although the module includes other interesting features (Bluetooth, physical buttons, TF card reader), I focused on data retrieval and display via WiFi and GPIO to fully utilize the capabilities of the e-ink screen.
To integrate it seamlessly into daily use, I designed and 3D-printed a mount that allows the device to be attached to an Ikea Skadis pegboard. This creates a minimalist and always-visible dashboard on my desk.
At the same time, I worked on the interface design to maximize clarity and readability, making the most of the e-ink display’s advantages.
This project is a Minimum Lovable Product (MLP): a first functional and enjoyable version, built within a reasonable timeframe, with room for future enhancements and features.
User Interface Design
There are 2 screens during the device boot process, before reaching the main dashboard:
- The splashscreen displaying the DataCrow project logo.
During this screen, the WiFi connection is established, and the red LED on the back of the display blinks. We stay on this screen until the WiFi is connected. - Then we have the "Getting data..." screen where we retrieve an initial set of data before displaying the main screen.
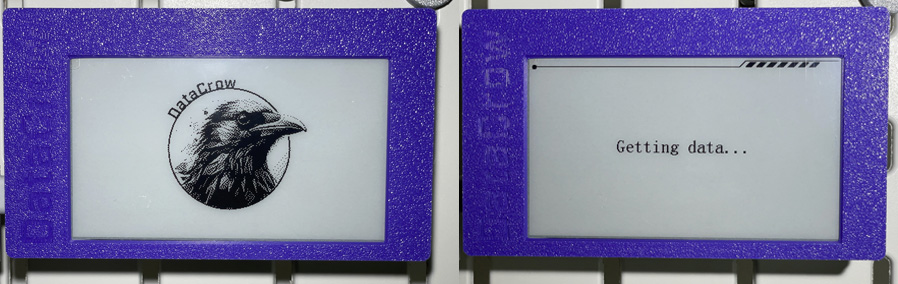
- On the main dashboard, I added a dynamic progress bar to notify the user that the program is still running, and to indicate how close we are to the next refresh.
- The DataCrow logo was generated using AI with Adobe Firefly, and the typography was added in Illustrator.
- For the UI design, I used free icons and interface elements from Streamline HQ. I then refined them in Illustrator to match the desired format.
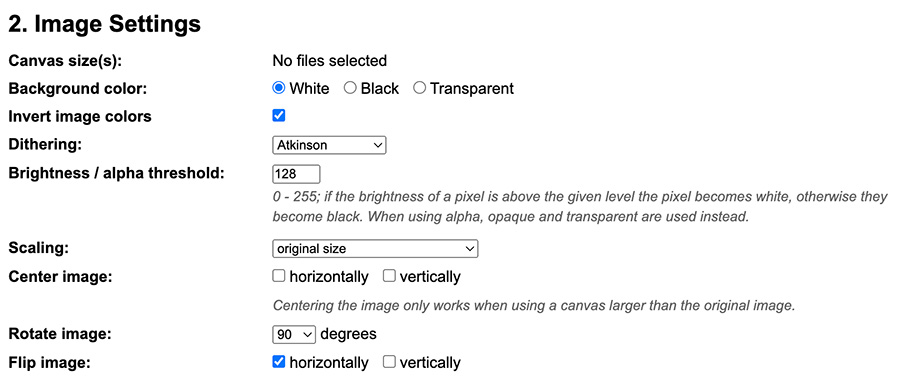
- To precisely position my graphical elements, I created a 416x240 screen template in Photoshop, allowing me to place elements pixel-perfectly and later transfer their positioning values into the code.
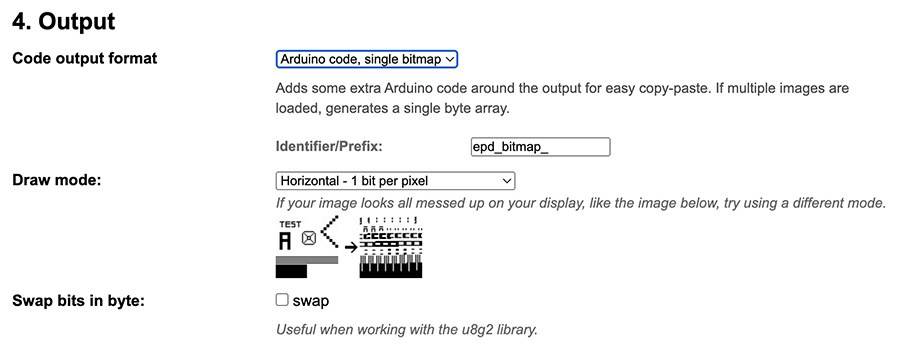
- The visual assets were converted using the online tool image2cpp
- I export my images as PNG in horizontal format with the following settings:
- For the splash screen (exported in full size 416x240), I apply a 270° rotation in image2cpp, which matches the rotation variable used in the code.
For all other objects and icons, I use a 90° rotation in image2cpp and 180° rotation in the code.
The Electronic Part
- To connect the DHT22 sensor to the CrowPanel's GPIO connector, I used a 2.54mm 2 x 10 Pin Male Double Row Right Angle Pin Header Strip.
- To stabilize the data signal sent by the sensor, a 10kΩ pull-up resistor is added between its DATA and VCC pins. I soldered it to the back of the small PCB to save space.

The 3D Printing Part
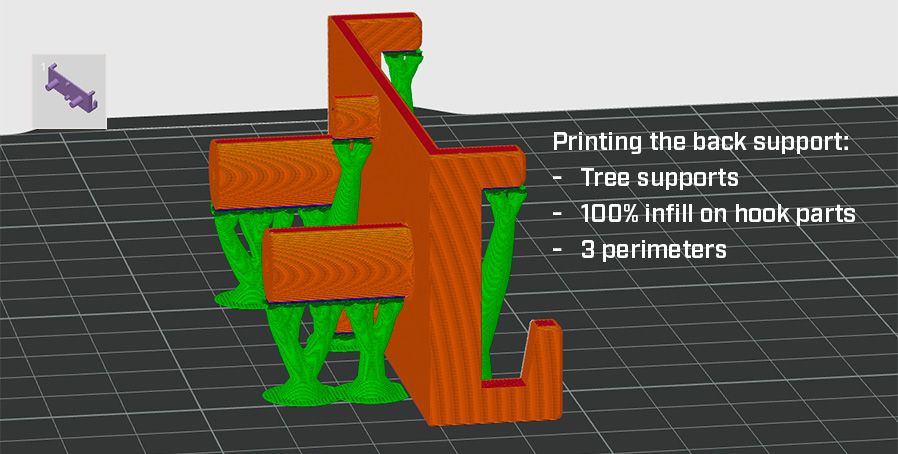
I designed (with Autodesk Fusion) a faceplate for the display, as well as a mount with 3 attachment areas:
- Attachment to the back of the display with 2 M2.5 x 8mm screws
- Attachment of the DHT22 sensor to the mount with 2 M2.5 x 8mm screws
- Attachment of the mount to the Skadis pegboard with 2 compatible hooks
For a good print of the rear support, I used tree supports.
Printed on a Bambu Lab A1, using Bambu Lab PLA Basic Purple filament.
All buttons on the back and sides of the display remain accessible.

The Code Part
The code was written using Arduino IDE, based on the basic functions provided by Elecrow to manage the display.
Initial Resources
You can find all relevant resources by checking Elecrow's tutorials on YouTube, as well as their dedicated Wiki and community forum:
- Tutorials: Watch on YouTube
- Wiki: Elecrow CrowPanel 3.7'' Arduino Tutorial
- Forum: Elecrow Display Forum
- CrowPanel 3.7’’ and Elecrow source code: Product Page
Display Functions
I used the basic display functions provided in Elecrow’s examples.
Their code is well-documented, so I was able to manage with my beginner-level coding skills.
However, I found the built-in functions quite limited and basic:
- No line-break handling for proper word wrapping.
- No text alignment options.
- No clear guidance on modifying fonts or fine-tuning text positioning.
Perhaps there are more powerful third-party libraries available?
Also, handling text and image rendering (full-size or partial) with the Rotation parameter is somewhat unclear.
All project graphics encoded as byte arrays are stored in the DataCrow_GFX.h file.
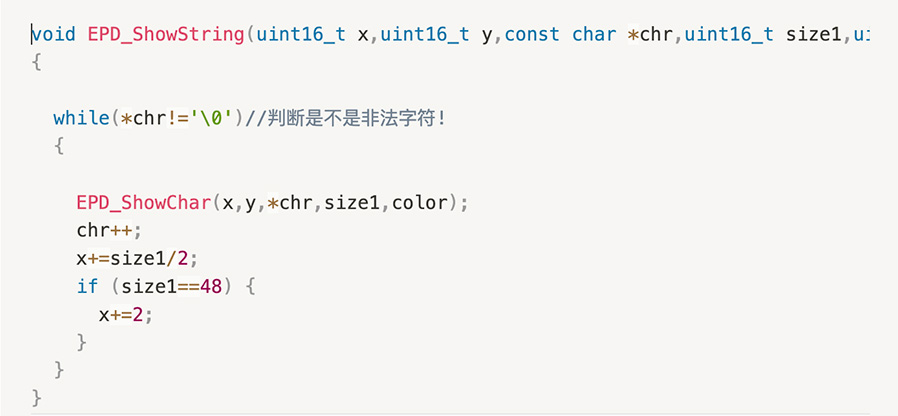
Letter-Spacing Adjustment
I added a letter-spacing feature to the EPD_ShowString() function to increase spacing between large characters, improving readability for large numbers.
Currently, this is hardcoded in the function, but it could be improved by adding a parameter for greater flexibility.
The modified function is located in EPD_GUI.cpp:
Millis() and DeepSleep
I use the millis() function to calculate data refresh time and progress bar updates.
I don’t use DeepSleep, but if you want to implement it, keep in mind that ESP32 resets the millis() counter after DeepSleep.
If needed, consider using a timer to manage time-based events.
Important variables
- WiFi credentials (replace with your actual details):
String ssid = “INSERT_YOUR_WIFI_SSID”;
String password = “INSERT_YOUR_WIFI_PASSWORD”; - Data refresh interval:
const unsigned long interval = 5 * 60 * 1000; // 5 minutes in milliseconds (300000 ms) - Progress bar refresh rate
const unsigned long interval2 = 10000; // 10 seconds
APIs Used
Bitcoin Price - CoinGecko API
API documentation: CoinGecko API
- The API is accessed via a simple HTTP GET request with the desired parameters.
- The free version doesn’t require an account and is sufficient for basic usage with limited requests.
- The response is a JSON object, which is parsed to extract the required data.
Random Quotes - ZenQuotes API
- API documentation: ZenQuotes API
- Similar to the CoinGecko API, it works via an HTTP GET request.
- The free version works without requiring an account.
DHT22 Sensor
The DHT22 is a classic and easy-to-use temperature and humidity sensor.
You can find many tutorials online, as well as example code from the official library or by asking ChatGPT.
Specific Libraries Used
- DHT Sensor Library – by Adafruit
- ArduinoJson – by Benoît Blanchon
Experience & Improvement Ideas
What I Liked About This Product
- Great potential as it’s an all-in-one device (screen, microcontroller, buttons, GPIO port, WiFi, Bluetooth, TF card…) at an affordable price.
- The e-ink display has excellent sharpness and readability with low power consumption.
The finalized project runs at just 0.30W of power consumption (based on the stabilized v1.0 code), and has been running smoothly for several months without any issues. - A powerful ESP32-S3 microcontroller with plenty of memory.
- Multiple buttons to interact with the device.
Aspects I Would Suggest Improving
- The buttons are great for prototyping, but once the screen is housed in a case, their accessibility can be somewhat reduced.
- The small rotary switch is quite delicate, so it requires gentle handling.
- The provided graphics library offers a solid foundation, though there may be room for more advanced features and flexibility.
- GPIO port orientation: A possible improvement could be to have it face the back with a female connector, which would simplify integration into enclosures. Alternatively, a flat ribbon connector that stays flush with the top, similar to the prototype I created, could also be a practical solution.
Future Improvement Ideas for This Project
- Optimize the code for better efficiency.
- Change the default large typography to improve readability.
- Add user interactions via a touch sensor, allowing users to change the displayed data type or manually refresh the data.
- Integrate air quality sensors for additional environmental data.
- Use the TF card reader to display stored images or save environmental data.
- Test more powerful and user-friendly graphic libraries, if any exist.
I hope this project inspires you!
Feel free to reach out if you have any questions or improvement suggestions.
A big thanks to Elecrow for providing me with the CrowPanel 3.7'' to explore in a DIY project!
It was a great opportunity to test part of the potential of this type of product and share a hands-on use case with the maker community.