


Story
Step 1: What We Need For?

Ok, a main control board is necessary, Crowduino-UNO is a good choice. It can compatible with many kinds of sensors. Moreover an Arduino sensor shield also should be prepared, we can link the sensors and others to it by the jumper wire, it works well with Crowduino-UNO. Then we choose the 4 bits digitron display module board as a display device, at last we need a reset button to clear the data after every count.
In general, we need these module:
Sensor Shield V4.0 For Arduino x 1
Adjustable Infrared Sensor Switch 3 - 80cm x 3
4 Bits Digitron Display Module Board For Arduino x 1
Jumper wire x 4
Step 2: Let's Start to Assemble


Firstly, put the Crowduino UNO on the table, then plug the Arduino sensor shield onto it. The sensor shield provides convenience to use sensors, and we can plug the three adjustable Infrared sensor switchs onto it easily as pictures show (use D5,D6,D7 port to connect). It seems like three tentacless with three eyes.
Step 3: Reset Button


Then we should set a reset button for every count. Crowtail- button looks more professional, the 3 pin crowtail to male splittable jumper wire also make it perfect for using with sensor shield. You just need to connect the GND, VCC, SIG to corresponding D2 port as follows:
Step 4: 4 Bits Display Module

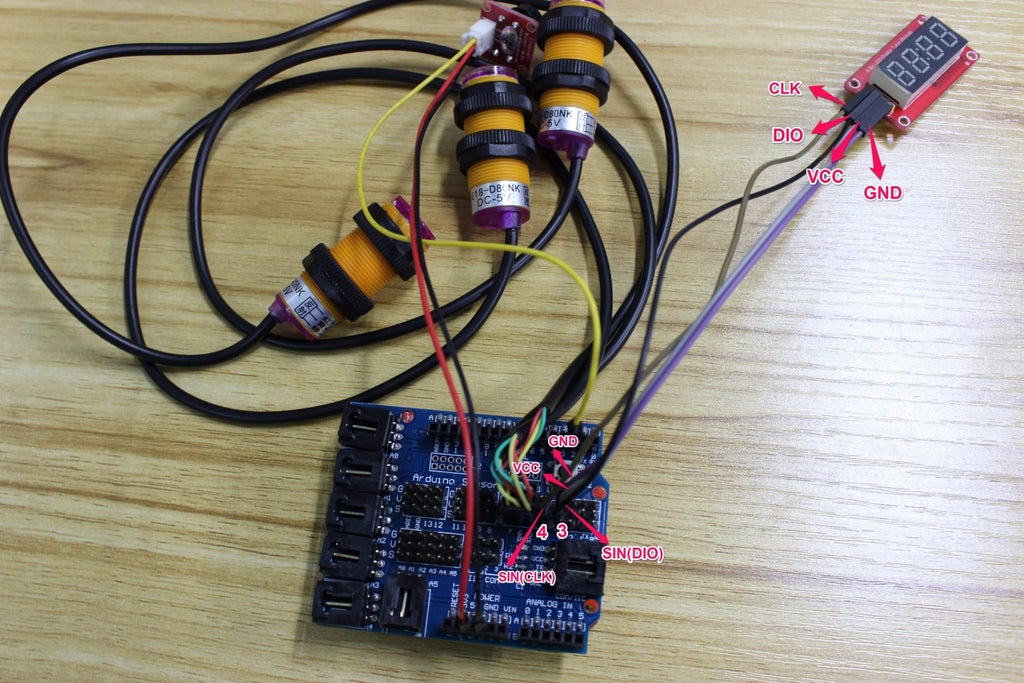

At last we need something to display the quantity of goods, finally choose the 4 Bits Digitron Display Module Board which use driver TM1637. It's connected to sensor shield with 4 Jumper wires, the "CLK" link to the "SIG" of D4 port, the "DIO" link to the "SIG" of D3 port. “VCC” link to ”VCC" of D3 port, "GND" link to "GND" of D3port. OK!
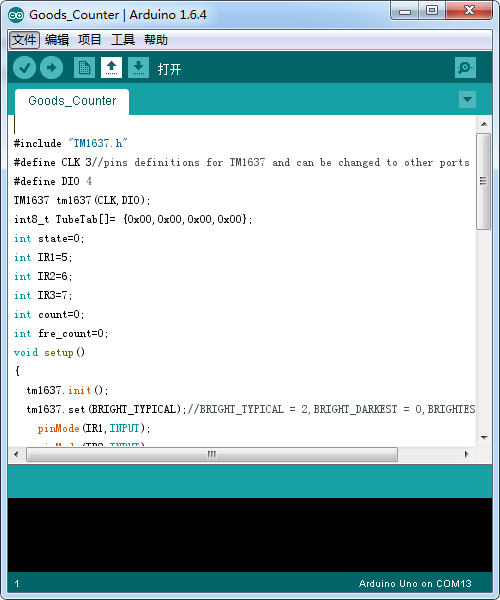
But we need to program it first, below is the program files, you can downlod and unzip it, please remeber to put the file named "DigitalTube" into the library, then upload the program to your Crowduino- UNO, it will make our application has a function: if something blocking any one of the three infared sensor switchs, it will do a count.
Up to now, our goods counter has been substantially completed. It can work normally when you power it with a 9V,1A DC power. you could see the picture that shows his work status.
Step 5: Bulid a Home for Him


So how to use it to count goods? We can not always hold it for counting, it's time to made a home for "him" too.
Look at this big guy! It made of pieces of boards, there is a gentle slope that goods can through the Infrared sensor switchs one by one. Don't worry! It‘s assemble simply, just make the pieces of wood board glued together. Ok, well done! Let him live in his new home now. First, plug the three Infrared sensor switchs into these holes, then fixed the reset button and display on the board with glue.
It can work now as video shows, our colleagues seem very satisfied with it. The high sensitivity absolutely meet the requirement of counting. Be not underestimate this "boy", it will save much time of our work even reduce the error count.
It easy to DIY and low cost! Please take action to make your own counter, believe that it will greatly enhance the work efficiency of us!
Or you can develope more functions of it, like motion counter, cash registers and so on. In a word, all good for you to discover.


